


Email Piping / Auto Importing Tickets
Email Piping is a feature in CRM to auto open or reply to ticket from email.
You can’t use both methods for auto importing tickets. You need to configure only 1 method (cPanel Forwarders or IMAP) depends on your requirements.
- On your mail server you must create a unique email account for each support department, this must be a full inbox.
- In Perfex navigate to Setup -> Support -> Departments > Edit and enter your email address for this department.
Email forwarders method (cPanel Method 1)
- Login to you cPanel account
- Go to Forwarders section and setup forwarder using the following command based on your department “php -q /home/username/public_html/crm/pipe.php” . Eq. If you department is Info and you setup info@yourdomain.com as email in the department you should forward this email. Repeat this step for each department.
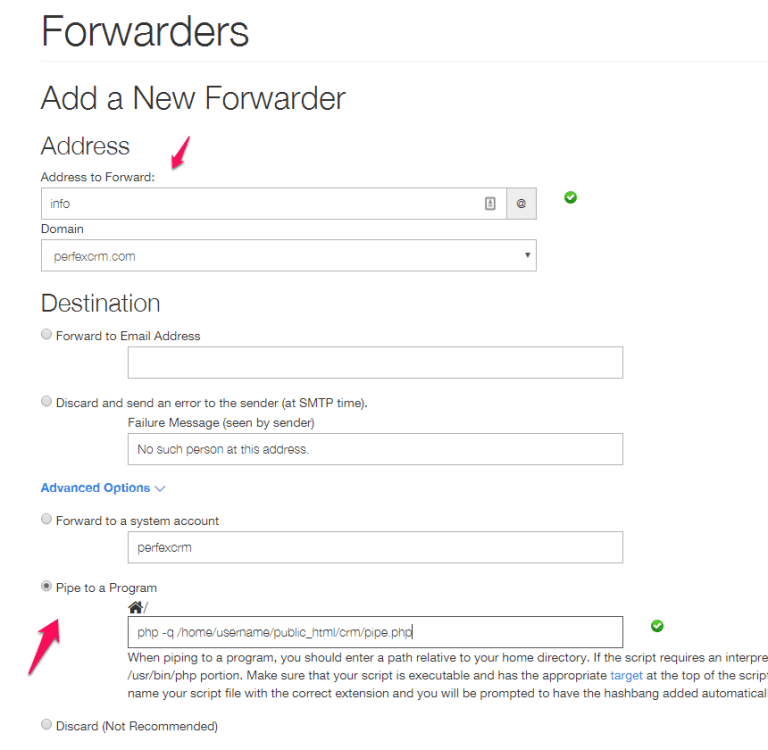
TIP: You can check the pipe path into Setup -> Settings -> Tickets -> Email Piping.
IMAP (Method 2)
This method auto import tickets directly reading your email.
- If you want to use this method you need to have setup cron job.
- The cron will run each 5 minutes and will check for new tickets.
NOTE: The script will check only non-opened emails to prevent checking all the emails again and again and avoid slowing down the system. After checking email if you don’t have checked delete after import the script will auto mark the email as READ.
If you are setup existing email address that has a lot of emails make sure that all emails are marked as READ to prevent importing spam emails when the cron job will run and read your emails the first time.
Your PHP build needs IMAP support for this method to function correctly.
- On your mail server create a unique email account for each support department. This must be full inbox alias email is not supported.
- Navigate to Setup->Support->Departments for each department add your IMAP credentials, click test IMAP connection to test if the connection is successful and your credentials are good.
- Follow the test steps mentioned below.
Gmail IMAP Auto Import Notes
- If you are using google apps account make sure you verified your domain name.
- If you are using google apps account make sure you enable IMAP.
- If you get connection refused while testing IMAP connection check that your server’s firewall isn’t blocking traffic to Google.
- Make sure you have enabled less secure apps
- For IMAP server try imap.gmail.com
- Check encryption SSL
To control/block any spam emails you should visit Setup->Support->Spam Filters.
Testing the Email Piping
If you are using the IMAP auto importing tickets method you will need to wait 5 minutes the cron job to run.
After you set up, try sending some test email. If everything is good a new ticket will be opened inside the CRM. While testing you should not use your or any staff address to send a message.
Staff email addresses are only for ticket replies only and you cant create a new ticket with staff email.
Should a ticket not be created when sending in an email, then check in Utilities > Ticket Pipe Log. If the message was received by Perfex it will be listed here with the reason why it failed to create a ticket. If the message you sent is not listed here, then the forwarder you set up previously is not working correctly and didn’t receive the message.
If you get the error message “Ticket ID Not Found” this means you are trying to open a support ticket from your staff email address.
Staff can only reply to tickets, not open new ones so submit a ticket from any other email address and it should be accepted.
Known problems you can encounter
If an email has not been piped into the ticket system the first reference point is Utilities > Ticket Pipe Log. This shows all the emails processed by email piping process and any errors that may have occurred, explanations of the three most common errors are below:
Ticket ID Not Found
This means you are using an email address assigned to staff to send your email. Staff can only reply to tickets and cant open new tickets sending an email to the support emails.
If you want to test, you must send an email from an email address that is not assigned to staff.
Only Replies Allowed by Email
The log means that an email was received to the department email address, but the subject did not contain a ticket ID. If you have set to Yes Only Replies Allowed by Email option located in Setup -> Settings -> Support->Email Piping config the email is rejected from the system.
Inline attachment not included in ticket body (cPanel forwarder method)
Sometimes it’s not possible for us to fetch the inline attachments from the email body and include in the ticket. Only regular attachments will be imported.
New Tickets/Replies are Imported Twice
Staff members not receiving an email when a new ticket is created or reply is posted
Click here to read more about the reason why this is happening.
Troubleshooting
If an email has not been piped into the ticket system and it is not listed in the Utilities > Email Pipe Log then these steps can be followed to identify the cause of the problem. There are different procedures depending upon whether the email forwarder piping method is used.
No Log outputted in the Email Pipe Log or Getting Mail Delivery
If no email pipe log when sending an email to your piped email address then the forwarder entry is not correct and the message is not being sent to the pipe.php file.
To correct this, first ensure the pipe.php file is chmod to 755.
If still not working try one of the following commands:

Setup Ticket Form
Embeddable ticket form in CRM is a predefined form for tickets added in version 1.8.0 which you can add to your websites with an iframe and when a user submits the form the ticket will automatically open a ticket in the system. You can use this form eq for a way your customers to contact you or offer support via this form on multiple websites.
Imagine you have 5 websites, you can embed the form in all 5 websites and in this case all the form submits will be created as a ticket in your CRM installation, in this case all your staff members/sales agents will be able to view the requests send and take appropriate actions in no time. If the email field in the ticket form already exists as a contact in CRM under specific customer, the system will auto add this ticket to this contact.
You can even add custom fields in the form, in Setup->Custom Fields if you create a custom field that belongs to tickets, a new checkbox will be shown at the bottom Show on ticket form, tick this checkbox if you want this custom field to be shown on the ticket form.
The form URL can be found at Setup->Settings->Support->Ticket Form.
The system will automatically show you a sample iframe embeddable code which you can copy and paste in your website.
Redirect User to Custom URL After Form Submission
Via FTP/cPanel go to application/helpers/ and create (if don’t exists) file my_functions_helper.php and add the following code snippet:
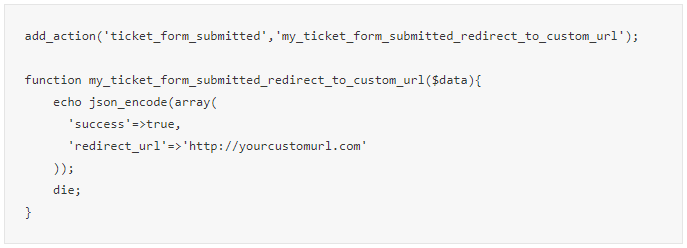
Don’t forget to include the <?php opening tag at the top of the file if it’s not already added.
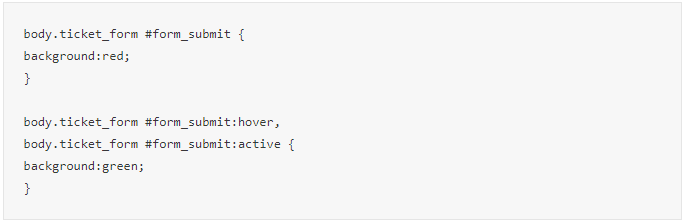
Styling
If you need to style the color of the input fields to fit with your website you can create custom.css file in assets/css and apply the necessary styles.
Example changing inputs border color:

Example changing submit button background color:
Passing department ID in URL (from v2.1.1)
If you are using the ticket form to a multiple URL’s where on each URL you need to send the ticket to a different department without the user that is filling the form knowing this, you can pass parameter in the ticket form URL to achieve this.
For example, let’s assume you have 2 different departments Billing and Technical Questions and the ticket form is placed on different landing pages or sections on your website corresponding to the department and you want each time the user fills the form e.q. on Billing landing page or section the ticket to go straight into the Billing department without the user knowing this.
The first step you need to make is to get the department ID in Setup->Support->Departments, on the table first column you will be able to see the department ID, for this example let’s assume that your Billing department has ID with number 1.
After you get the department ID, you should modify your ticket form URL to https://your-crm-installation.com/forms/ticket?department_id=1
If you visit the URL you will be able to see that the department field is hidden but the Billing department will be pre-selected and the ticket will go straight to the Billing department.
You can repeat this step for an unlimited number of departments, you will only need to change the department ID parameter.
Add custom form HTML, Eq. logo
In application/helpers create a file (if don’t exists) and add the following code:

Don’t forget to include the <?php opening tag at the top of the file if it’s not already added.
Keep in mind that you will need to change the logo URL.
When placing the iframe snippet code there are few things you need to consider.
- If the protocol of your CRM installation is HTTP then use a HTTP page inside the iframe.
- If the protocol of your CRM installation is https than use an https page inside the iframe.
- Summarized will be no SSL CRM installation will need to place the link in no SSL eq landing page and backward, SSL websites with SSL CRM installation and no SSL website with none SSL CRM installation. You can read more about this here
Departments
To configure your support system departments, navigate to Setup-> Support -> Departments and click New Department.
- Department name – Enter department name
- Hide from client? – Whether this department is hidden when customer is opening a ticket.
- Department email – Enter the department email
Email to ticket configuration
- IMAP Username – Only fill this field if your IMAP server use a username to log in instead of an email address. Note that you will still need to add an email address.
- IMAP Host – Enter your IMAP server hostname
- Password – Your email account password
- Encryption – Choose IMAP connection encryption
- Folder – After you are certain your IMAP configuration is correct, click Retrieve folders to retrieve your IMAP account folders. CRM will only import the emails that are received in the selected folder, usually you will want to use your mailbox INBOX folder.
- Delete mail after import? Whether you want the mail to be deleted after is imported as ticket.
If you configured email to ticket configuration, click TEST IMAP CONNECTION to ensure that your IMAP configuration is properly configured and the email to ticket feature will work properly.
NOTE:
- If you want to receive ticket emails you need to belong to the department. Only staff members/admins that belong to the department where the ticket is assigned receive the necessary emails
Ticket Services
Ticket services is a feature in CRM that allows your customer to select to what service/product this ticket is related when opening a new ticket.
Eq.
- Product/Service 1
- Product/Service 2
- Product/Service 3
When your customer will open the ticket the admin will know that this ticket is related to specific service.
You can easily enable / disable this option from Setup->Settings->Support.
To create a new ticket service navigate to Setup->Support->Services
Auto Close Tickets
CRM offers you the ability to auto close inactive tickets for a certain time.
This option is located in Setup->Settings->Cron Job->Tickets, you can enter time number of hours that must be passed from the last ticket reply in order the system to auto close the ticket.
Keep in mind that the system will only auto close tickets with the following statuses: Answered, Open and any other custom statuses you add for tickets in Setup->Support->Ticket Statuses
After the ticket is auto closed, the system will send an email to the customer informing that his ticket is closed, you can navigate to Setup->Email Templates and edit the email template with name “Auto Close Ticket” to format the contents to fit for your needs, you can even disable this template if you don’t want your customers to be informed when the ticket is auto closed.
You will need to have properly configured cron job in order this feature to work.
Disable Auto Close Tickets
If you want to disable the auto close tickets feature, navigate to Setup->Settings->Cron Job->Tickets and set Auto close ticket after to 0
Ticket Email Templates
You can easily customize all ticket email templates by going to Setup -> Email Templates -> Tickets
Here is a list for all ticket email templates:
- New Ticket Opened (Opened by staff, sent to customer) – (Sends to customer when ticket is opened from admin area)
- Ticket Reply (Sent to customer) – When admin add ticket reply this email will be sent to the customer.
- Ticket Reply (Opened by customer sent to staff members) – When client reply to ticket and an email will be sent to all staff member which department is the same like the ticket department.
- New Ticket Open Autoresponse – (When client open new ticket autoresponse message)
- New Ticket Created (Opened by custom, sent to staff members) – (When new ticket is opened by customer all the staff members which department is the same like the ticket department receives this email)
- Auto Close Ticket – This email will be sent when cron auto closes the ticket.
Feel free to disable any of the email templates if you don’t want to be sent
Allowed file extensions
For the support feature allowed file extensions are separated from the global system allowed file extensions.
To configure the support ticket file extensions navigate to Setup->Settings->Support-> Allowed file extensions.
The file extensions added will apply also when the ticket is auto imported from Email Piping or IMAP.
Maximum ticket attachments
Go to Setup -> Settings -> Tickets -> Maximum ticket attachments to adjust maximum tickets attachments.
Knowledge Base Link
When replying or opening ticket click on the button Insert knowledge base link.
A popup modal will be opened you only need to click on the plus icon to insert into the reply field, the link will be inserted where your cursor currently is pointed in the reply area edit.
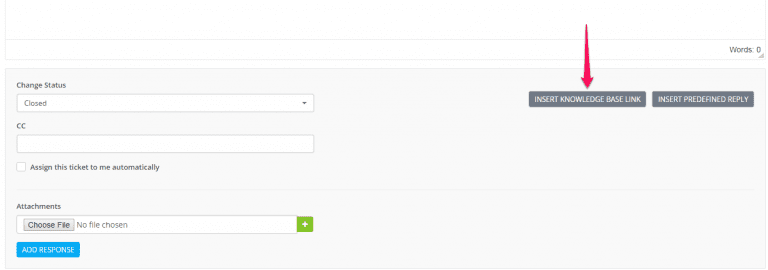
If Setup -> Settings -> Customers -> Use Knowledge Base is set to No you wont be able to use this option.
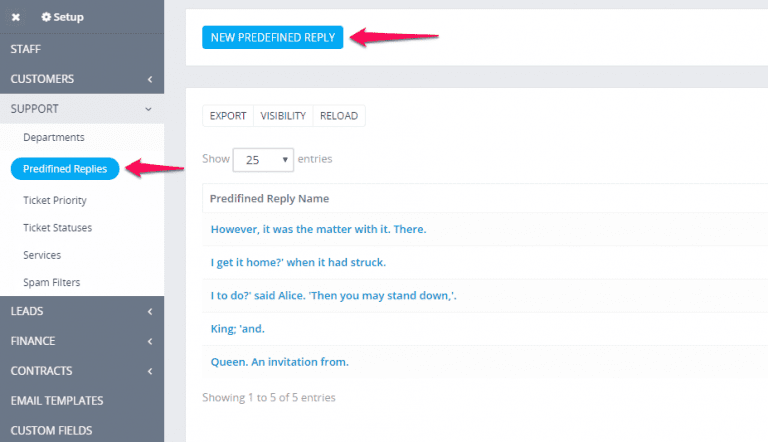
Predefined Replies
Setup some predefined replies that you are using very often so you wont need anymore to type it again and again.
Go to Setup -> Support -> Predefined Replies.
When replying or opening to ticket click on the button Add predefined reply. A popup modal will be opened you only need to click on the plus icon to insert into the reply field.
Change ticket status without making reply
You can change the ticket status without making the reply.
Open the ticket you want to change the status and on the top right side select the desired status.
Status will be updated automatically after change you dont need to save any changes.

No email will be sent to the customer to inform that the status is changed.
Statuses
You can easily customize ticket status by going to Setup->Support -> Ticket statuses
Perfex come with general predefined statuses which you cant delete them becuase they are around the application. You can only change the name. While listing ticket statuses you can view in this moment how many tickets are currently in the status.
Setting status color: Click on the edit button while listing and you can easely pick status color.
Priorities
You can easily customize ticket status by going to Setup->Support -> Ticket statuses
Perfex come with general predefined statuses which you cant delete them becuase they are around the application. You can only change the name. While listing ticket statuses you can view in this moment how many tickets are currently in the status.
Setting status color: Click on the edit button while listing and you can easely pick status color.
Ticket Email Templates
You can easily customize all ticket email templates by going to Setup -> Email Templates -> Tickets
Here is a list for all ticket email templates:
- New Ticket Opened (Opened by staff, sent to customer) – (Sends to customer when ticket is opened from admin area)
- Ticket Reply (Sent to customer) – When admin add ticket reply this email will be sent to the customer.
- Ticket Reply (Opened by customer sent to staff members) – When client reply to ticket and an email will be sent to all staff member which department is the same like the ticket department.
- New Ticket Open Autoresponse – (When client open new ticket autoresponse message)
- New Ticket Created (Opened by custom, sent to staff members) – (When new ticket is opened by customer all the staff members which department is the same like the ticket department receives this email)
- Auto Close Ticket – This email will be sent when cron auto closes the ticket.
Feel free to disable any of the email templates if you don’t want to be sent.
Open Ticket from Admin Area
To open new ticket click on the sidebar menu item Support -> New Ticket
- Select assignee. (Default is you and also you can set it to none)
- Select customer
- Select department
- Select desired priority
- Add ticket subject
- Add ticket message
To and Email address is field automatically so that means that you can add from this fields. This fields are only used for preview.
What happens when the ticket is created?
When ticket is created the client will receive email that a new ticket is opened. The email content can be configured from the Email Templates area going to Setup -> Email Templates -> New Ticket Opened (Admin). This is the email template that will be send to client when ticket is opened from the admin area directly to the client.
If you have choosed to assign this ticket to another staff member, this staff member will receive notification that this ticket is assigned to him.
If the staff member you are assigning the ticket is no in this department where the ticket belongs and the option Setup -> Settings -> Tickets -> Allow staff to access only ticket that belongs to staff departments is checked then he wont be able to view the ticket.
Email Piping / Auto Importing Tickets
Email Piping is a feature in CRM to auto open or reply to ticket from email.
You can’t use both methods for auto importing tickets. You need to configure only 1 method (cPanel Forwarders or IMAP) depends on your requirements.
What happens when the ticket is created?
When ticket is created the client will receive email that a new ticket is opened. The email content can be configured from the Email Templates area going to Setup -> Email Templates -> New Ticket Opened (Admin). This is the email template that will be send to client when ticket is opened from the admin area directly to the client.
If you have choosed to assign this ticket to another staff member, this staff member will receive notification that this ticket is assigned to him.
If the staff member you are assigning the ticket is no in this department where the ticket belongs and the option Setup -> Settings -> Tickets -> Allow staff to access only ticket that belongs to staff departments is checked then he wont be able to view the ticket.
- On your mail server you must create a unique email account for each support department, this must be a full inbox.
- In Perfex navigate to Setup -> Support -> Departments > Edit and enter your email address for this department.
Email forwarders method (cPanel Method 1)
- Login to you cPanel account
- Go to Forwarders section and setup forwarder using the following command based on your department “php -q /home/username/public_html/crm/pipe.php” . Eq. If you department is Info and you setup info@yourdomain.com as email in the department you should forward this email. Repeat this step for each department.

TIP: You can check the pipe path into Setup -> Settings -> Tickets -> Email Piping.
IMAP (Method 2)
This method auto import tickets directly reading your email.
- If you want to use this method you need to have setup cron job.
- The cron will run each 5 minutes and will check for new tickets.
NOTE: The script will check only non-opened emails to prevent checking all the emails again and again and avoid slowing down the system. After checking email if you don’t have checked delete after import the script will auto mark the email as READ.
If you are setup existing email address that has a lot of emails make sure that all emails are marked as READ to prevent importing spam emails when the cron job will run and read your emails the first time.
Your PHP build needs IMAP support for this method to function correctly.
- On your mail server create a unique email account for each support department. This must be full inbox alias email is not supported.
- Navigate to Setup->Support->Departments for each department add your IMAP credentials, click test IMAP connection to test if the connection is successful and your credentials are good.
- Follow the test steps mentioned below.
Gmail IMAP Auto Import Notes
- If you are using google apps account make sure you verified your domain name.
- If you are using google apps account make sure you enable IMAP.
- If you get connection refused while testing IMAP connection check that your server’s firewall isn’t blocking traffic to Google.
- Make sure you have enabled less secure apps
- For IMAP server try imap.gmail.com
- Check encryption SSL
To control/block any spam emails you should visit Setup->Support->Spam Filters.
Testing the Email Piping
If you are using the IMAP auto importing tickets method you will need to wait 5 minutes the cron job to run.
After you set up, try sending some test email. If everything is good a new ticket will be opened inside the CRM. While testing you should not use your or any staff address to send a message.
Staff email addresses are only for ticket replies only and you cant create a new ticket with staff email.
Should a ticket not be created when sending in an email, then check in Utilities > Ticket Pipe Log. If the message was received by Perfex it will be listed here with the reason why it failed to create a ticket. If the message you sent is not listed here, then the forwarder you set up previously is not working correctly and Perfex didn’t receive the message.
If you get the error message “Ticket ID Not Found” this means you are trying to open a support ticket from your staff email address.
Staff can only reply to tickets, not open new ones so submit a ticket from any other email address and it should be accepted.
Known problems you can encounter
If an email has not been piped into the ticket system the first reference point is Utilities > Ticket Pipe Log. This shows all the emails processed by the Perfex email piping process and any errors that may have occurred, explanations of the three most common errors are below:
Ticket ID Not Found
This means you are using an email address assigned to staff to send your email. Staff can only reply to tickets and cant open new tickets sending an email to the support emails.
If you want to test, you must send an email from an email address that is not assigned to staff.
Only Replies Allowed by Email
The log means that an email was received to the department email address, but the subject did not contain a ticket ID. If you have set to Yes Only Replies Allowed by Email option located in Setup -> Settings -> Support->Email Piping config the email is rejected from the system.
Inline attachment not included in ticket body (cPanel forwarder method)
Sometimes it’s not possible for us to fetch the inline attachments from the email body and include in the ticket. Only regular attachments will be imported.
New Tickets/Replies are Imported Twice
Staff members not receiving an email when a new ticket is created or reply is posted
Click here to read more about the reason why this is happening.
Troubleshooting
If an email has not been piped into the ticket system and it is not listed in the Utilities > Email Pipe Log then these steps can be followed to identify the cause of the problem. There are different procedures depending upon whether the email forwarder piping method is used.
No Log outputted in the Email Pipe Log or Getting Mail Delivery
If no email pipe log when sending an email to your piped email address then the forwarder entry is not correct and the message is not being sent to the pipe.php file.
To correct this, first ensure the pipe.php file is chmod to 755.
If still not working try one of the following commands:

Departments
To configure your support system departments, navigate to Setup-> Support -> Departments and click New Department.
- Department name – Enter department name
- Hide from client? – Whether this department is hidden when customer is opening a ticket.
- Department email – Enter the department email
Email to ticket configuration
- IMAP Username – Only fill this field if your IMAP server use a username to log in instead of an email address. Note that you will still need to add an email address.
- IMAP Host – Enter your IMAP server hostname
- Password – Your email account password
- Encryption – Choose IMAP connection encryption
- Folder – After you are certain your IMAP configuration is correct, click Retrieve folders to retrieve your IMAP account folders. CRM will only import the emails that are received in the selected folder, usually you will want to use your mailbox INBOX folder.
- Delete mail after import? Whether you want the mail to be deleted after is imported as ticket
If you configured email to ticket configuration, click TEST IMAP CONNECTION to ensure that your IMAP configuration is properly configured and the email to ticket feature will work properly.
NOTE:
- If you want to receive ticket emails you need to belong to the department. Only staff members/admins that belong to the department where the ticket is assigned receive the necessary emails.