


Invoices
Merging Invoices
Merging invoices is feature in CRM that allows you to merge/include already created invoices into 1 invoice by passing all the invoice info to new invoice. This feature is used if your customer have other unpaid invoices but you need to create another invoice for the customer and you want to prevent your customer to pay multiple invoices, in this case your customer will only need to pay 1 invoice.
How to check if there is available invoices to be merged?
Available invoices to merge are showing in different places.
- When create new invoice – Available invoices to merge are shown after selecting customer, the system will check if there is available invoices to be merged into the invoice you are creating for the selected customer.
- When you preview existing invoice from admin area – Available invoices will be shown on top and you can click on the edit button to apply the necessary action.
- When you edit existing invoice – Available invoices for merging are shown imidiately after entering the edit invoice area.
You can merge invoices only that belongs to the following statuses: Unpaid, Overdue, Draft.
Eq. If the invoice you edit is with status Partialy Paid you wont be able to merge exisiting invoices in this invoice with status Partialy Paid.
How to merge the invoices?
When you create/edit invoice on the top a message will be shown if there is invoices available for merging.
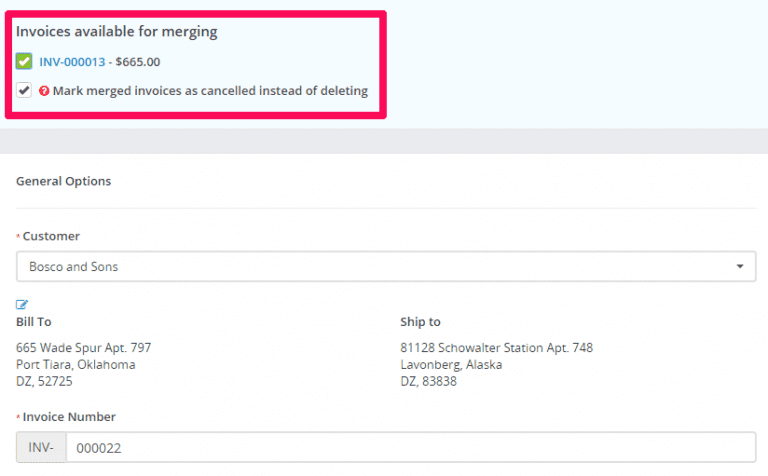
You can merge multiple invoices by clicking on the checkbox on the left side from the invoice number.
After the field is checked the invoice items will be auto added in your existing invoice that you are currently creating or edit.
Additionaly you can mark the merged invoices as cancelled instead of deleting because merging invoices will create gaps in invoice numbers. Please do not merge invoices if you want no gaps in your invoice history. You also have the option of manually adjusting invoice numbers if you want to fill the gaps.
Cancelled invoices are excluded from the reports and overdue reminders are disabled.
Invoice Overdue Notices
You can send invoice overdue notice manually or automatically with cron job.
Sending with cron job
To setup automatically overdue notice go to Setup -> Settings -> Cron Job -> Invoices
If you want to send overdue notice the same day when the invoice is overdue set the field Automatically send reminder after to 0, otherwise set it according to your needs.
The second field is about resending the overdue notice based on the last notice date. If you want to disable resending the overdue notice set this field to 0
The overdue notices will be sent at specific hour based Hour of day to perform automatic operations value that is set in Setup->Settings->Cron Job->Invoices
Record Invoice Payment
While viewing the invoice from the admin area click on the + Payment button to record a new invoice payment, after you click on the button new view will be shown including the record payment form.
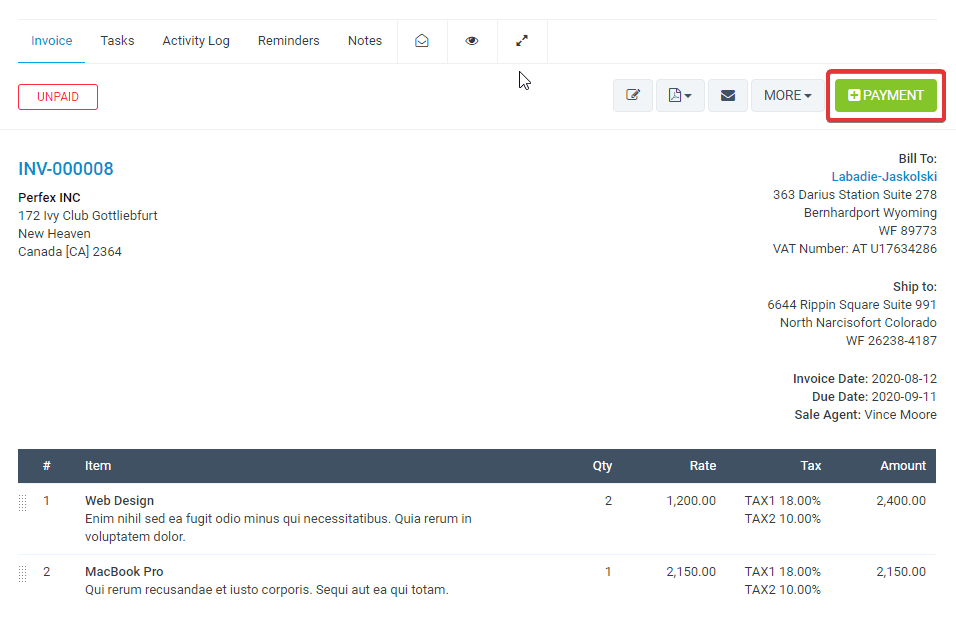
Keep in mind that the + Payment button will be shown only if the user has permissions for payments CREATE, also this button may be disabled in the invoice is with status Paid or Cancelled.
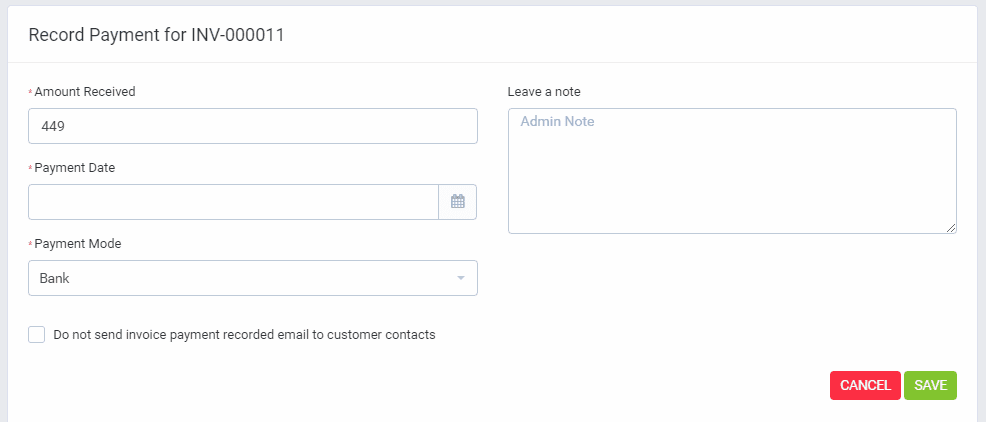
- Amount Received – The total amount that is paid for this invoice, this field will be auto-populated based on the invoice due amount.
- Payment Date – Select date for the payment, by default current date will be selected.
- Payment Mode – You need to select one of the available payment modes for this invoice. Is payment mode not shown on the list? Click here to read more.
- Additional you can add payment note.
- Do not send invoice payment recorded email to customer contacts – If checked no email will be sent to customer contacts that payment is recorded for this invoice. In case you want to disable this option you can disable the email template in Setup->Settings->Invoice Payment Recorded (Sent to customer contacts), after the template is disabled this field won’t be shown and no email will be sent to the customer.
- Click Save
After the payment is recorded the invoice status will be automatically updated based on the total amount. If the full amount is recorded for this invoice, the status will be updated to Paid otherwise will be updated to Partially Paid.
Email sent to customer contacts
If “Do not send invoice payment recorded email to customer contacts“ is unchecked after payment is recorded email (with PDF payment attachment) will be sent directly to the customer contacts to inform that payment is recorded for this invoice.
To edit the email content go to Setup -> Email Templates -> Invoice Payment Recorded (Sent to customer contacts).
Email sent to staff
Additionally, the system will send another email (Invoice Payment Recorded (Sent to staff) to invoice sale agent and invoice creator, this email will be sent too when the customer pays the invoice online via an online payment gateway.
Keep in mind if the payment is recorded via the admin area from staff member this (currently logged in) staff member won’t receive an email.
Troubleshooting
Payment modes not shown on invoice
Payment Modes Not Shown on Invoice
1. Make sure that you have checked the payment mode for this invoice.
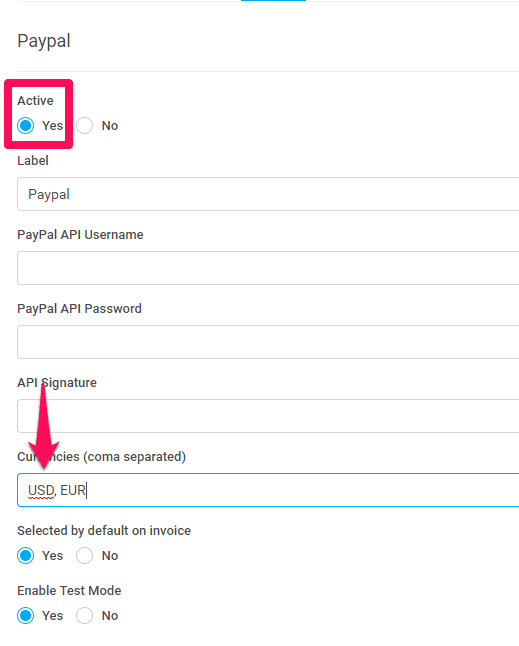
2. If the payment mode is online payment gateway make sure that the invoice currency matches the comma separated currencies in Setup->Settings->Payment Gateways and the payment gateway is active.
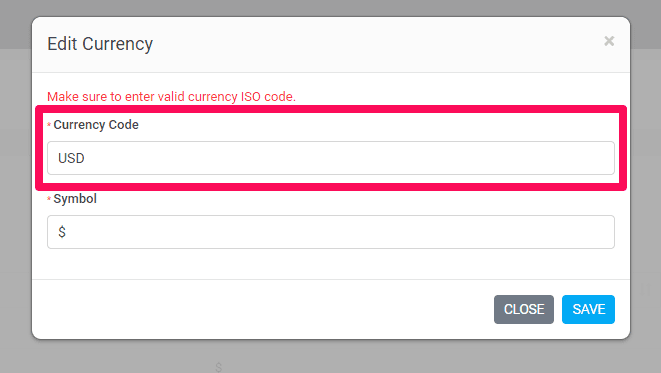
Navigate to Setup->Finance->Currencies and check if the Currency code matches the comma separated currencies like in the second picture example.
Send Invoice to Email
The option to send this invoice to a customer which is related. Also, the PDF invoice will be attached to the email. If you want to do not attach the PDF invoice simple uncheck the checkbox Attach Invoice PDF
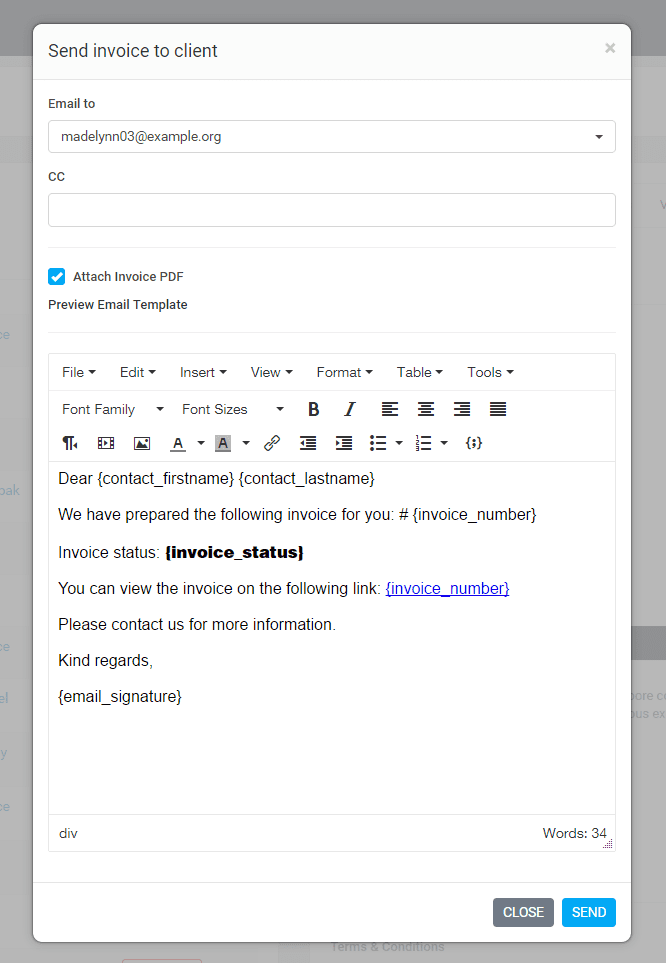
After sending the invoice to the customer if you want to send again the invoice there will be another email content. Becuase the initial invoice is already sent. Now the customer maybe want the invoice again and in all cases this content will be different. Go to Setup-> Email Templates -> Invoice Already Send to Client to edit the email content when sending the invoice to your customer for second time.
By default all contacts with enabled email notifications for invoices will be selected you can adjust to your needs.
When cron job will try to send the invoice eq. for expiration reminders will be sent to all contacts with enabled email notifications for invoices.
Recurring Invoice
Settings
Navigate to Settings Menu -> Settings -> Cron Job
Create a new invoice from the main recurring invoice only if the main invoice is with status paid?
If this field is set to No the recurring invoice is not with status paid the new invoice won’t be created
Hour of day to perform automatic operations (24 hours format eq. 9 for 9am or 15 for 3pm.)
The invoice will be re-created at a specific time of the day, based on the hour you have configured in this option.
Example if the invoice should be re-created at 1st of May if you set here 09 the invoice will be re-created 1st of May 9 AM.
Action to take after invoice is re-created
- Generate and Autosend the renewed invoice to the customer – NOTE: The customer contacts must configured email notification for invoices in order to receive the email.
- Generate a Unpaid Invoice
- Generate a Draft Invoice
Create recurring invoice
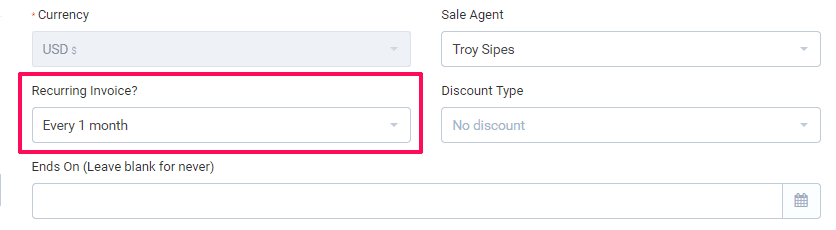
When you add/edit invoice you have an option to set this invoice to be recurring.
That means that the invoice will be re-created automatically based on your setup for recurring invoice (every X months). You can set recurring starting from 1 month to 12 months or select custom to fit your needs.
How are the recurring days calculated?
The date when the invoice needs to be re-created(renewed) is calculated from the invoice date.
The dates in the examples are shown in Y-m-d format.
Example 1:
- Invoice date is XXXX-08-17
- Recurring is every 1 month
- The invoice will be re-created (renewed) on XXXX-09-17
Example 2:
- Invoice date is XXXX-03-01
- Recurring is every month
- The invoice will be re-created (renewed) on XXXX-04-01
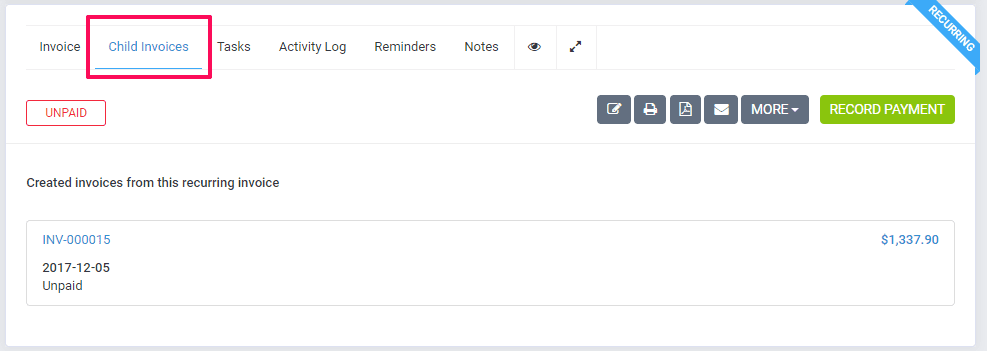
When the invoices from this invoice will be generated you will have an overview which invoices are generated from this invoice at the Child Invoices tab.
Stop a Recurring Invoice
In order to stop recurring invoice, you will need to go to the invoice edit area and set the Recurring Invoice drop-down field to NO.
NOTES:
- You need to have setup cron job for this feature.
- Recurring Draft invoices won’t be re-created.
- Recurring invoices with status Cancelled (canceled invoices) will be still re-created when the date for the next recurring invoice comes. In case you don’t want the invoice to be re-created from canceled invoice you must edit the invoice and set Recurring to No.
Create Invoice
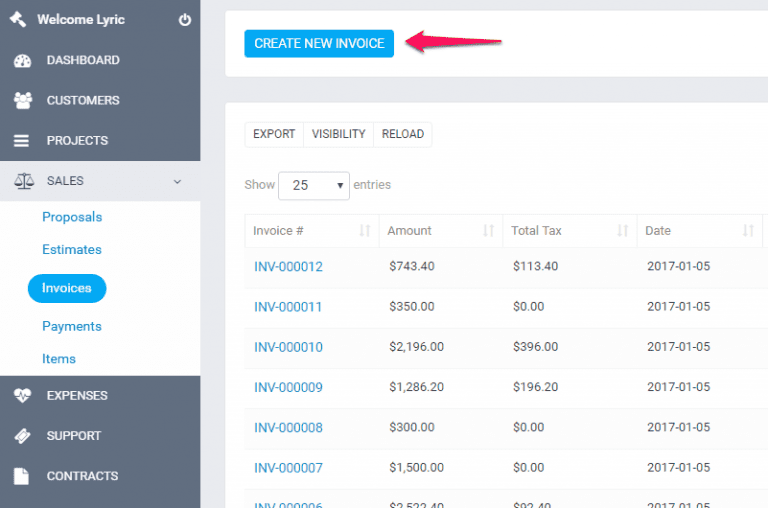
To create new invoice go to Sales -> Invoices and click on the button Create new invoice
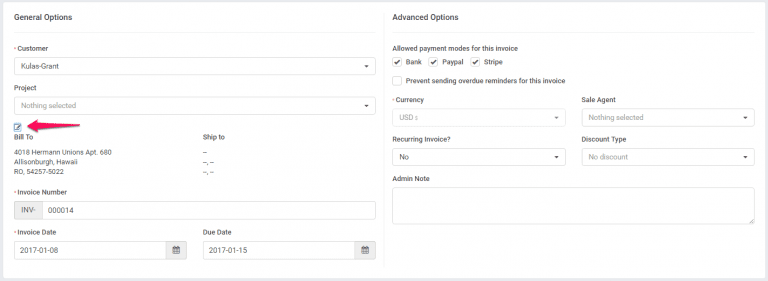
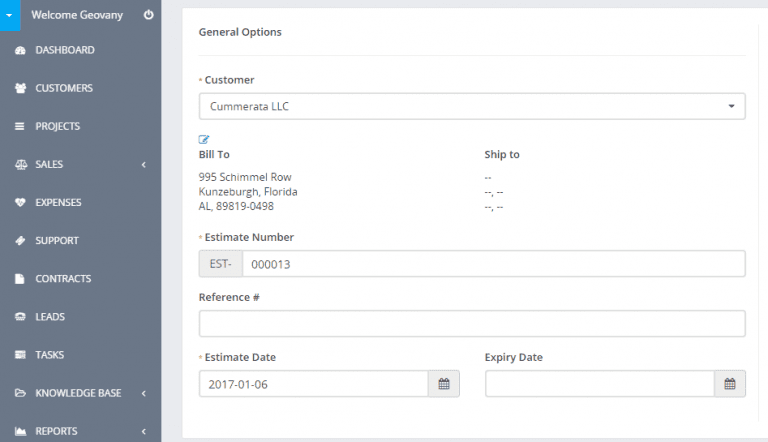
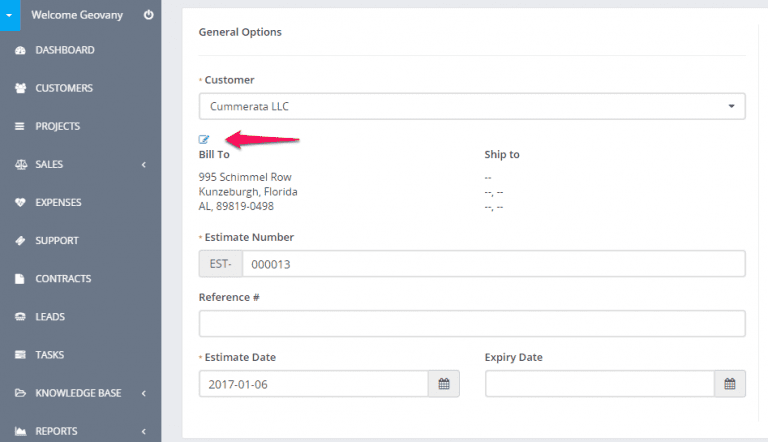
Select Customer, when selecting a Client the customer informations will be fetched directly from the customer’s profile. Another option is that you can click on the edit icon and directly add the desired customer informations, this also is applied for the billing informations they are also fetched when selecting a customer.
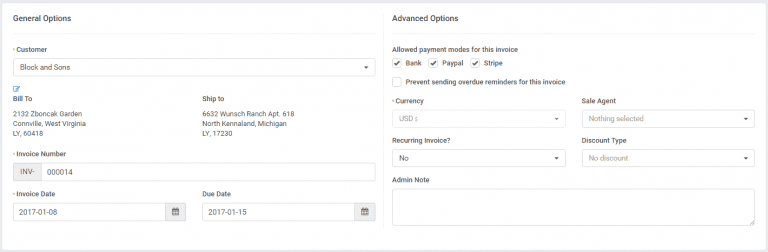
NOTE: If you want the billing details to be auto populated when selecting the customer you need previously to have added Billing details in the customer profile.
Billing and Shipping – If you change the billing and shipping informations after selecting a client and click on the edit icon, this will be changed for the Invoice but in the customer profile the informations will remain the same.
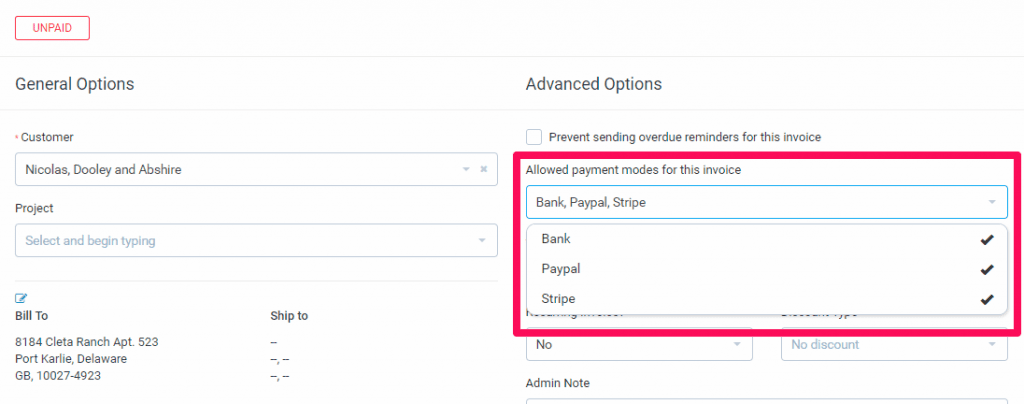
– Select allowed payment modes for the invoice you are creating, if you customers pays online using CRM payment gateways they will be visible in the invoice html area and when recording payment for invoice from admin area.
Currency – The currency is automatically selected based on your default currency or currency set for the selected Customer you selected previously in the customer profile. If the currency for this customer is USD it will be automaticly selected and cannot be changed, read more here
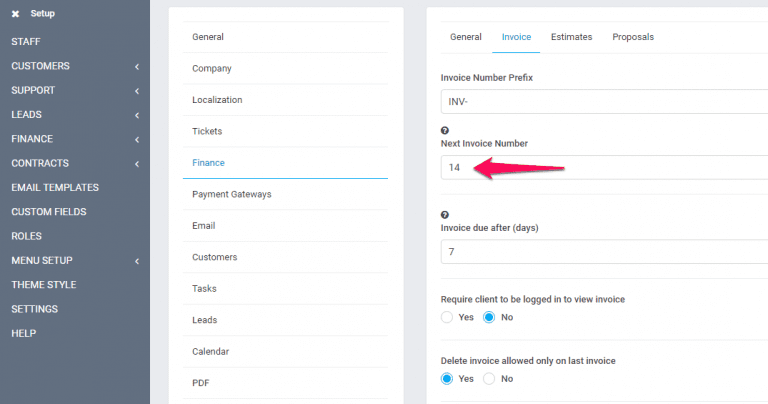
INVOICE Number – Number is automatically populated Eq. 00012 next will be 00013.
This number its fetched from Setup->Settings->Finance->Invoice– Next Number the number its auto increment but you can change the next number in Setup->Settings->Finance->Invoice.
Customer note is visible to client side also, on the HTML invoice and PDF invoice.
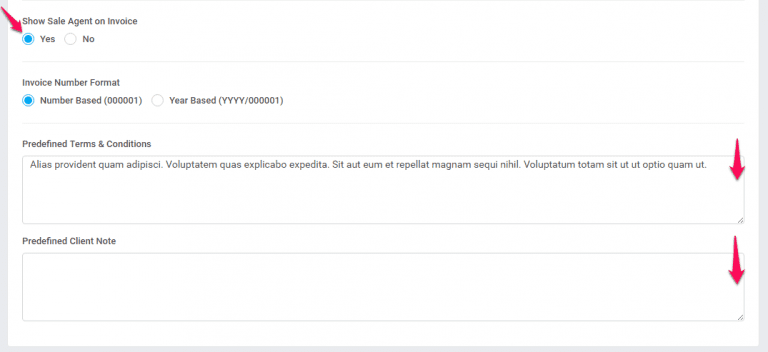
You can setup terms directly in the invoice or you can have predefined terms which will be auto populated. To setup predefined terms go to Setup -> Settings -> Finance -> Invoice scroll down and you can populate the fields as it fits you.
Recurring Invoice – Read more here about how to setup recurring invoice.
Sale Agent – You can select sale agent for this invoice then then generate reports in Reports->Sales->Invoices Report. Note that the sale agent full name will be shown on the invoice if in Setup->Settings->Finance->Invoice-> Show sale agent on invoice is set to yes, see picture.
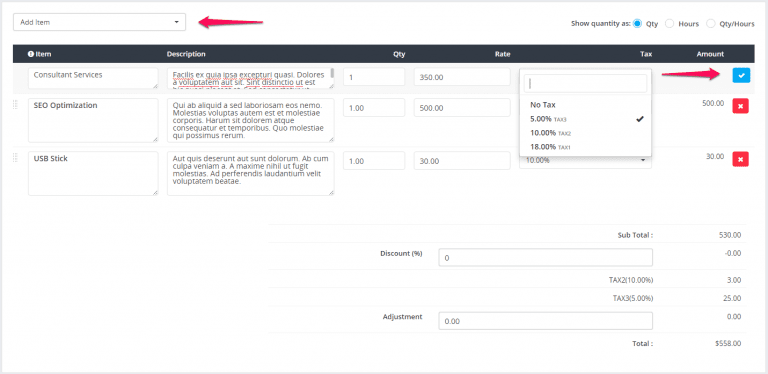
You can add Invoice items, when adding make sure u click on the blue check icon in order the item to be added you can also select tax options see shown in picture.
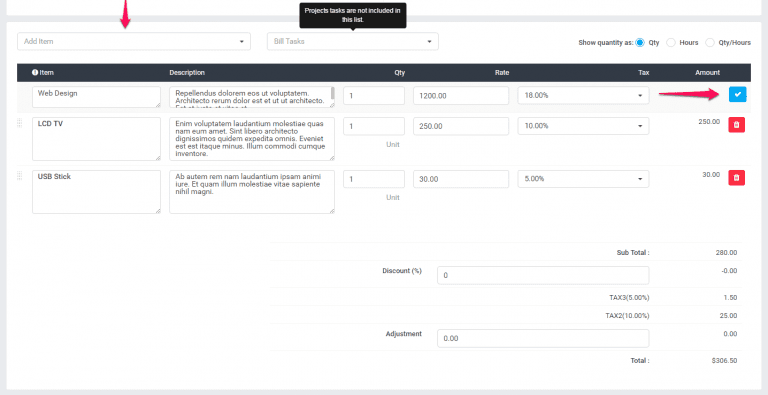
The items will be stored separately for each invoice and changing the items informations in Sales->Items wont affect the already created invoices with specific item/s.
Admin note is only for admins/staff members.
Customer note is visible to client side also, on the HTML invoice and PDF invoice.
Click Save.
While editing/creating invoice the adjustment option is always available if you want to +- the total amount
Exporting Customers Invoices/Estimates
/Payment to ZIP
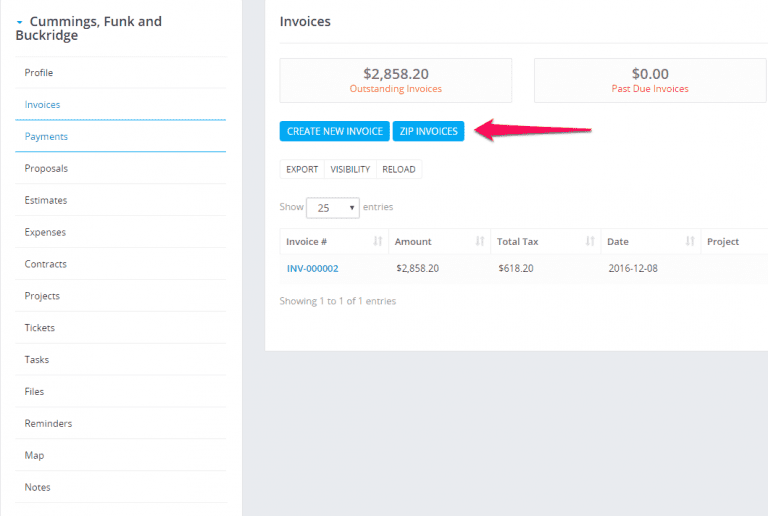
Go to the customer profile and click on the tab you want to export data eq. invoices
Select status or just leave it All and click Submit. All invoices based on your selected options will be added to .zip file.
You can choose start and end date, the date is based on invoice/estimate/payment date
Estimates
Link Estimate To Project
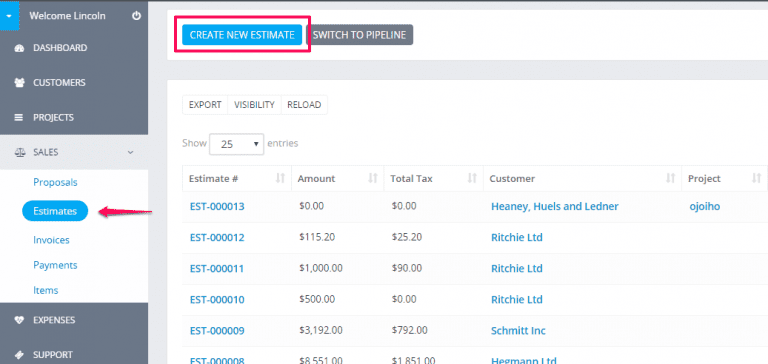
- Go to Menu -> Sales -> Estimates and click Create New Estimate
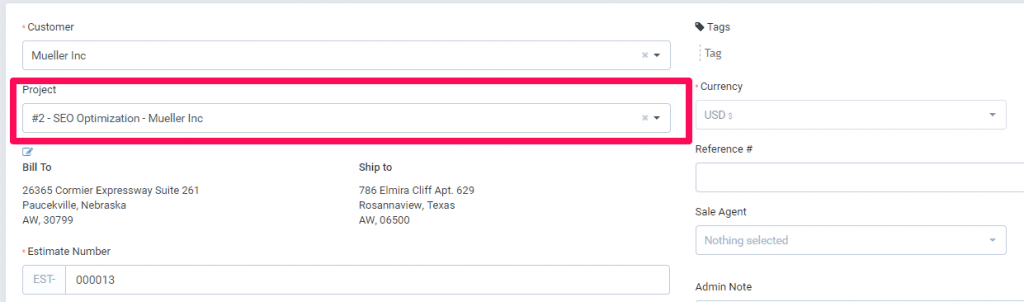
- Select customer.
- A drop-down with projects will be shown below the customers select field (if no projects associated with the selected customer the dropdown with projects wont be shown)
- Select the project
- Configure the estimate for your needs
- Save the estimate
- Navigate to the project area and click on the tab Sales->Estimates you will be able to see the newly created estimate associated with your selected project.
Send Estimate to Email
Option to send this estimate to customer which is related. Also the PDF estimate will be attached to the email. If you want to do not attach the PDF estimatae simple uncheck the checkbox Attach Estimate PDF
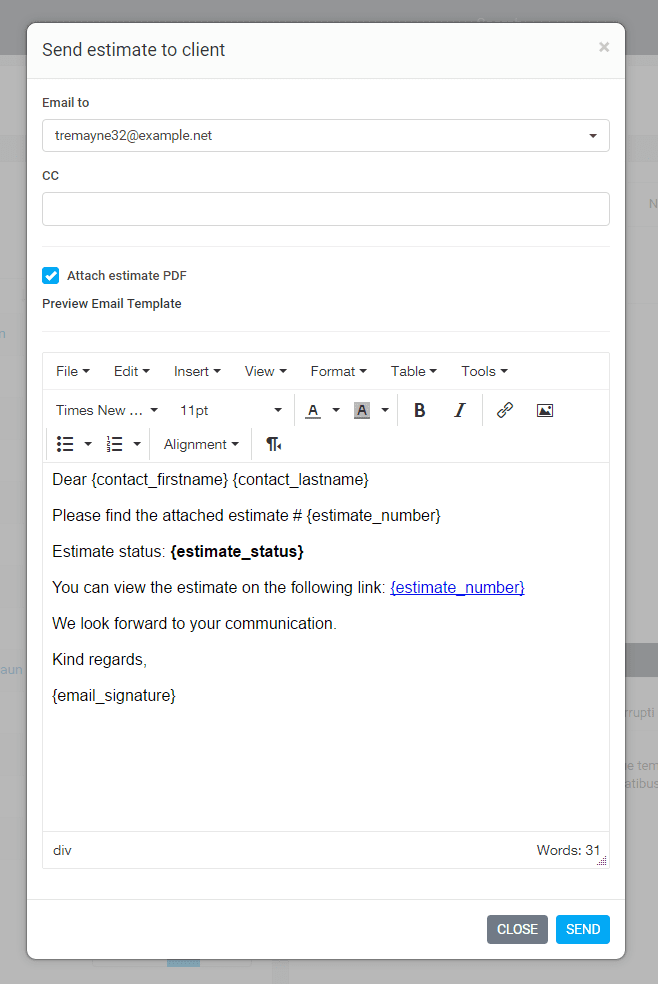
After sending the estimate to the customer if you want to send again the estimate there will be another email content. Becuase the initial estimate is already sent. Now the customer maybe want the estimate again and in all cases this content will be different. Go to Setup-> Email Templates -> Estimate Already Send to Client to edit the email content when sending the estimate to your customer for second time.
By default all contacts with permission estimate will be selected you can adjust to your needs.
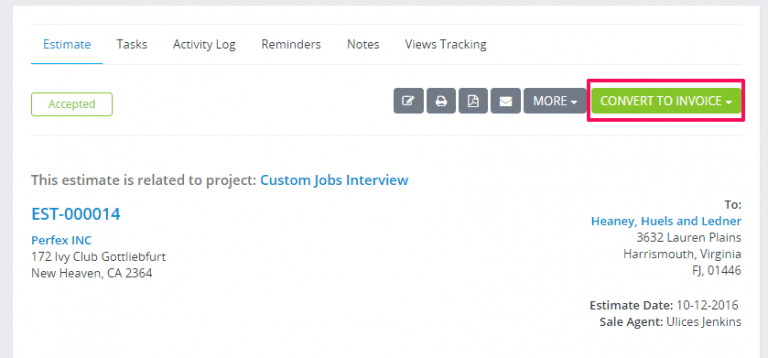
Converting Estimate To Invoice
You can easely convert the estimate to invoice from the admin area.
Open the estimate you want to convert and on the right side click Convert to Invoice
Create Estimate
To create new estimate go to Sales -> Estimates -> Create New Estimate or by clicking on the Build icon on the top left side and click Create Estimate
Client – Before selecting a client you must have added clients Customers->New Customer.
When selecting a Customer the customer informations will be fetched directly from the customer profile you created. Another option is that you can click on the edit icon and directly add the desired customer informations, this also is applied for the billing informations they are also fetched when selecting a customer.
If you want the billing details to be auto populated when selecting the customer you need previously to have added Billing details in the customer profile.
Billing and Shipping – If you change the billing and shipping informations after slecting a client and click on the edit icon, this will be changed for the Estimate but in the customer profile the informations will remain the same and wont be any changes in the Invoice.
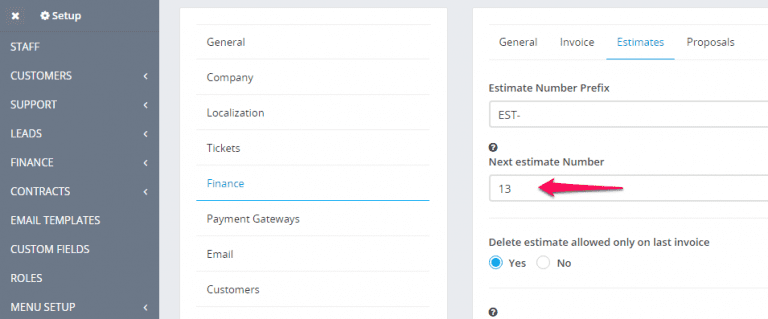
Number – Number is automatically populated Eq. 001 next will be 002.
This number its fetched from Setup->Settings->Finance->Estimates – Next Number the number its auto increment but you can change the next number in Setup->Settings->Finance->Estimates.
Status – By default the draft status will be selected, you can change the status anytime you want, note that when you send the estimate to your customer the status will be change auto to SENT.
Currency – The currency is automatically selected based on your default currency or currency set for the selected Customer you selected previously in the customer profile. If the currency for this customer is USD it will be automaticly selected and cannot be changed, read more here
Sale Agent – You can select sale agent for this estimate then then generate reports in Reports->Sales->Estimate Report. Note that the sale agent full name will be shown on the estimate if in Setup->Settings->Finance->Estimates -> Show sale agent on estimate is set to yes.
You can add Estimate items, when adding make sure u click on the blue check icon in order the item to be added you can also select tax options see shown in picture.
The items will be stored separately for each estimate and changing the items informations in Sales->Items wont affect the already created estimates with specific item/s.
Admin note is only for admins/staff members.
Customer note is visible to client side also, on the HTML estimate and PDF estimate.
You can setup terms directly in the estimate or you can have predefined terms which will be auto populated. To setup predefined terms and conditions navigate to Setup -> Settings -> Finance -> Estimate scroll down and you can populate the fields as it fits you.
Click submit to save the estimate.
While editing/creating estimate the adjustment option is always available if you want to +- the total amount
Converting proposal to estimate/invoice
To convert proposal to invoice or estimate select the proposal from the table and on the right side a convert button will be shown

Click on the button and choose Estimate or Invoice. After you choose a popup will be shown with the preview info also with the parsed items which are auto inserted to the estimate/invoice.
When you are satisfied from the result click Save.
After converting the proposal will be auto marked as accepted (if is not already marked as Accepted).
If the proposal is related with some lead which is not converted to client you will need to convert first the lead to client and then get back here and convert the proposal to estimate or invoice.
Exporting Customers Invoices/Estimates/Payment to ZIP
Go to the customer profile and click on the tab you want to export data eq. invoices
Select status or just leave it All and click Submit. All invoices based on your selected options will be added to .zip file.
You can choose start and end date, the date is based on invoice/estimate/payment date