


Import Leads From WordPress Contact Form 7
1. Import Leads From WordPress Contact Form 7
CRM has the ability to import/capture leads from the most popular contact form (and any other customizable forms) for WordPress Contact Form 7 together with the Email Integration feature which is built in CRM.
The process is very easy, once you configure the contact form to be compatible with the email integration, you will import leads in no time with the fields filled in contact form automatically added for the imported lead.
We recommend you first to read this whole setup article to get the idea how the contact form fields will be mapped and how the leads will be imported in CRM to get familiar with the steps you need to perform in order to make this config working, then you can move on to configure the full setup.
Prerequisite for this setup is to have previously configured properly working lead email integration in Perfex CRM, click here to read more how to configure.
For the simplicity of this example and setup, we will use a minimal example for Contact Form config with fields Name, Email, Message (see below for more detailed example).
Install Contact Form 7
If you already have Contact Form 7 installed and you are familiar with Contact Corm 7 you can skip this step.
If you haven’t already installed Contact Form 7, you must install the plugin from your WordPress dashboard area, from the left menu navigate to Plugins->Add New and search for Contact Form 7, after you find the Contact Form 7 plugin click on Install and after installation click on Activate.
We assume that you are already familiar how Contact Form 7 works and how you can embed the form into custom page eq. Contact Us, in case you are not, you can read more by clicking here.
Configure Contact Form 7
In this example, we will use the basic Contact Form 7 config which comes with the form after installation.
After you install and activate the plugin from the WordPress admin menu click on Contact->Contact Forms
Chose the form you want to configure and click on the name.

Click on the Mail tab in the contact form to configure the contact form email to be compatible with CRM.
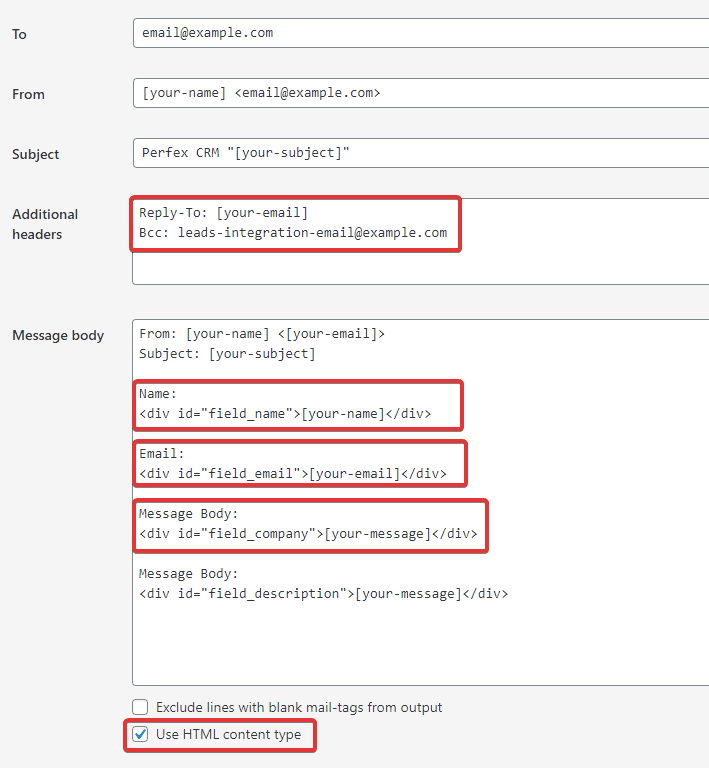
It’s highly recommended always to include the email field in the message and Reply-To header in the Additional Headers section with the merge fields [your-email]
Additional Headers
Add your CRM integration email configured in Setup->Leads->Email Integration.
In new line add eq. Bcc: yourleadsintegrationemail@example.com
Make sure that the Reply-To header is set as shown in the image.
This is the important part, in this case when a user fills out the form, the contact form plugin will add BCC your leads email integration email and the CRM CRON job will be able to catch this email and import the lead with the provided fields.
Message Body
The point here is to wrap all form values and include in the email message/body with:

After the email is sent this field will be populated with the actual field value and will become eq.

You will need to replace LEAD_FIELD with the actual lead field.
You will need actually to create a contact form field in order to add the fields in the email body.
Use HTML content type
In Contact Form 7 mail tab check Use HTML Content Type, in this case, the email will be HTML.
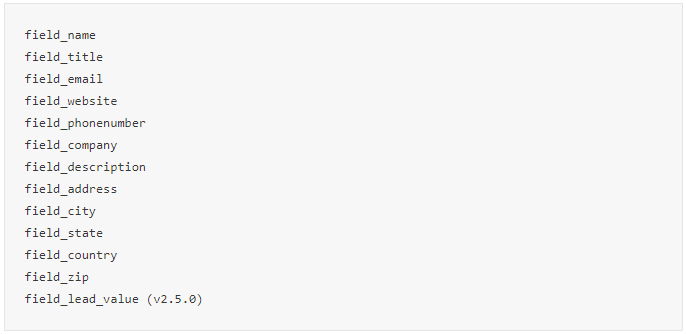
Available lead fields
Country Field
If you are passing a country field, keep in mind that the country must be ID from CRM database table for countries (tblcountries) or the name Eq. United States (without typos) because CRM script will compare the country name passed in the message body and find suitable country id from CRM countries table.
Eq user writes United States, this will work fine, but if a user writes a country name that does not exist in countries table or makes a typo eq. Untited States, CRM won’t be able to identify the ID of the country from countries table.
Custom Fields
In case you want to integrate a custom field for a lead, you can use custom_field_ID, Replace the ID with the actual custom field ID which can be found in Setup->Custom Fields.
If you use a custom field the email message markup should look like this:

Note that if you are adding custom fields of type Checkbox or Select, the options must be the same like the one you added in CRM custom field option in Setup->Custom Fields. Also for dates fields, the dates custom fields must be passed in Y-m-d format.
Eq. example for a custom field of type Select in CRM – Click here to see the options config.
Eq. example for a custom field of type Select in Contact Form 7 – Click here to see options config.
Attachments
In the Mail Tab in Contact Form 7 simply add the field tag in the File Attachments Area.
Keep in mind that only attachment extensions allowed in Setup->Settings->General (CRM installation) will be added while importing the lead.

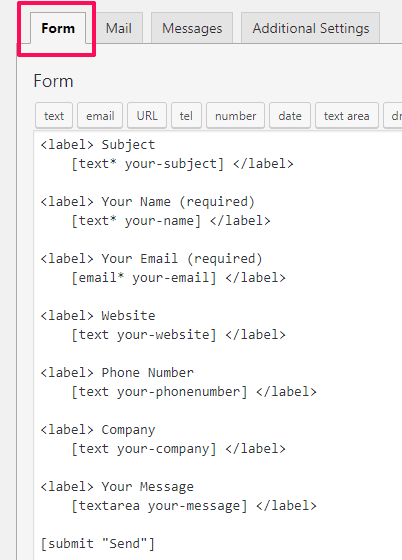
Full example with more fields
Let’s say our Contact Form 7 have fields:
- Subject
- Name
- Website
- Phone number
- Company
- Message
Contact Form Fields
Our contact form fields config should look like this (you can format it however you like):
Mail Tab Config
Click on the mail tab to configure the email body content.
You can get the available shortcodes of the field values at the top of the Mail Tab Config where it says “In the following fields, you can use these mail-tags”
The email body content should look like this:
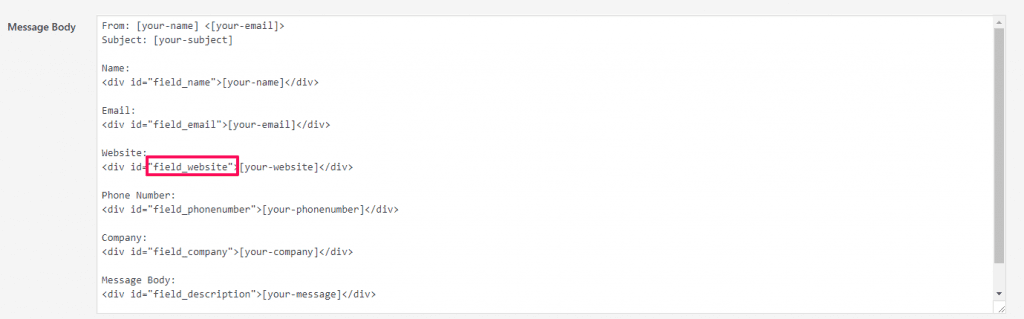
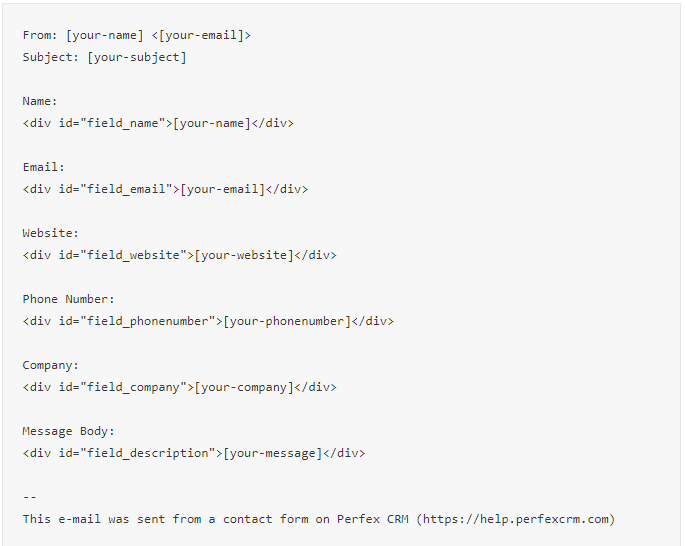
You can see how all field values are wrapped within div with id=”field_LEAD_FIELD”, the LEAD_FIELD is actually from the available lead fields
In this example the message that the user will write in the contact form we are populating the lead description text area, which is suitable for this case.
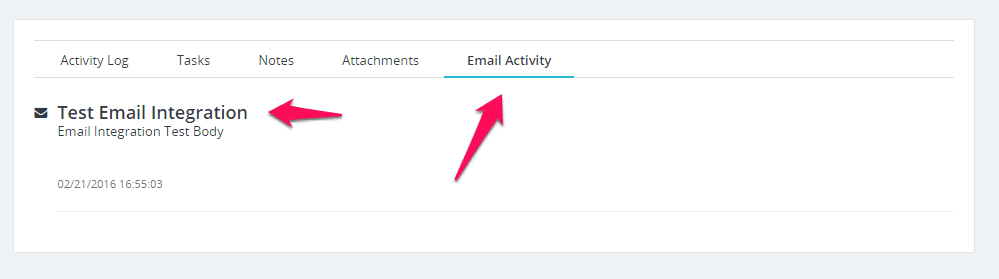
Keep in mind that the subject won’t be added to the leads section of CRM because the subject is not suitable for any field that belongs to lead, you can either create a custom field or you will be able to view the subject by clicking on the Email Activity tab in the lead modal, click here to check how this will look.
Now when a user fills Contact Form 7 the plugin will add your email integration email as BCC header and this email will be sent too to the email integration email.
The CRM cron job will read this email and map all fields provided within the email message and import the lead in CRM leads section.
You can apply this logic to any WordPress contact/form plugin which allows you to change the email content and add BCC, you can even use this with a pure PHP email form, you just need to BCC your leads email integration and format the email body as mentioned above, isn’t this awesome?
Leads email integration
Leads email integration is powerful feature who allow you to integrate leads from your email address. You can set up email forwarder from any form you are using and you will get the leads into the CRM.
Eq. You are using 4 forms on different websites, you set in your cPanel forwarders when you receive an email from any of these forms to forward to the leads email which you have set up in Setup -> Leads -> Email Integration
This feature is very sensitive so make sure you read the explanation carefully.
Its recommended to start with a new brand email for this feature which will be used only for leads integration forwarding. No replies, composing emails from this email account. Meanwhile, it’s your responsibility for the unwanted results.
Navigate to Setup-> Leads -> Email Integration.
By default, this feature will be inactive. When you configure the email integration you can set to active so the cron can process emails if any found.
- IMAP Server – Your leads email IMAP Server.
- Email address (Login)
- Password
- Encryption (SSL/TLS/No Encryption)
- Delete email after import – If you check this option the mail will be deleted after a successful import.
- Auto mark as public – Auto mark this lead as public, public leads are visible to all staff members.
- Folder – Default is INBOX – If you are using Gmail you cant change to ex. Social, forums, update leave it to INBOX
- Check Every (minutes) – The cron will check for new emails every X minutes you set up here. Its recommended this field to be bigger than 10 minutes. Don’t hard change in the database.
- Only check none opened emails – By default the cron will check only none opened emails. After checking the email will set this email as opened so the next time won’t be checked. This is used to prevent checking all the emails again and again in each cron run. Example if you have 40000 emails there the CRON will be very slow and you won’t be satisfied with the results. In this case, if this field is checked everything will work fine.
- Default Source – After lead importing add source. Ex. Email Integration
- Default Status – The default status to be assigned after import
- Responsible for the new lead – auto assigns responsibility for this lead.
- Notify when lead imported – Do you want to be notified when new lead is imported from the email integration
- Notify if lead sends email multiple times – This is used when a lead send email multiple times. Ex. the lead sends an email and is imported after that send another email but the lead already exists in the database so when viewing this lead on the right side you can view all emails from this lead send. If this option is checked and lead sends multiple emails you will be notified.
If the lead is with status CLIENT nothing will happen and no email will be saved in the database.
- Notification – Staff Members with a role or Specific Staff Members – If you don’t select any staff or roles no one will be notified no matter if the notification fields above is checked.
Admins won’t be notified when a lead is imported from email if they are not checked.
After you set up, all the fields SAVE the email configuration and test the connection clicking on the TEST IMAP CONNECTION button on the right side
Authentication failures
If your authentication is failing, there are several likely causes:
- You have the wrong username or password
- Your connection is being diverted to a different server (as above)
- You have specified authentication without encryption
Common issues with Gmail or G Suite – Invalid username or password
Invalid username or password when use Gmail or G-Suite can be a common error if you haven’t turned Less Secure Apps to ON, however, it’s recommended first to check if your password is correct.
G-Suite
- Sign in to the Google Admin console.
- Click Security > Basic settings.
- Under Less secure apps, select Go to settings for less secure apps.
- In the subwindow, select the Allow users to manage their access to less secure apps radio button.
- In case you are not receiving the emails and your SMTP configuration test email is showing that the configuration is working properly, take a look at the following articles:
Gmail Regular Account
- Log in to your user account.
- Visit: https://www.google.com/settings/security/lesssecureapps
- Toggle on.
2 Factor Authentication Enabled
If you are have enabled 2-factor authentication on your Google Account, you MUST generate an application password and add the password in the password field.
Click here to read how to generate App Password.
Notes
- After the lead is imported the email will be set to open.
- This feature does not auto-populate the leads fields, only the email and the name will be auto-populated. If the sender has setup NAME in the email client will be auto-populated in the lead name field otherwise the email will be taken as a name because the email clients add the email as a name if no name is specified. If you want additional fields to be populated you need to format your email HTML as explain here
- Set lead to junk if the imported lead is not accurate for you to prevent double importing. If you delete the lead and this lead send an email again will be imported again. Better to set it to junk.
- If you have unchecked Only check none opened emails – all emails will be checked again and again meanwhile only will be checked non opened emails.
- If the email integration feature is set to active and the CRON cant connect to the IMAP server activity will be logged. To check the activity go to Utilities -> Activity Log and find [CRON] Failed to connect to IMAP lead email integration
- If the lead exists in the CRM after checking the email and this lead is with status junk the email won’t be saved into the database and no notifications will be received.
- If the lead is already manually added into CRM you will receive notification that this lead sends an email and the email subject and body will be logged into the lead profile.
- If any attachments found in the email will be auto imported for this lead.
If you dont want to use brand new email address for this feature you have to configure the leads email integration in different way.
- Uncheck the field Only check non opened emails
- Navigate to Setup->Email Templates and disable the email template (New Lead Assigned to Staff Member) to send notification when lead is assigned.
- If you have ex 1000 emails uncheck all notifications settings to prevent receiving 1000 notifications in the CRM.
- Let the cron run 1 time and check all the emails. After all leads from your email is imported revert to back to the old settings mentioned above
Setup Web to Lead Form
CRM Web to Lead feature allow you to build a web form based on leads fields and custom fields to place it on your website, landing page etc as an iframe.
The visitors can then enter their names, email addresses, upload attachment and other basic information to create a lead directly in CRM.
To create new web to lead form, from the main admin menu navigate to Setup->Leads->Web To Lead
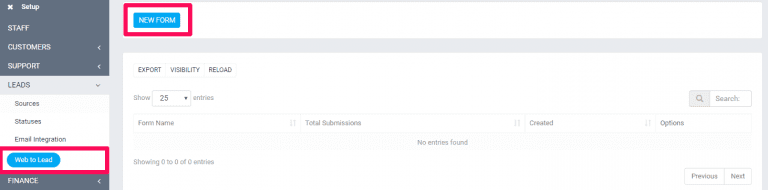
Click on the button on the top left side New Form
NOTE: You will be able to build the form after you first create the initial form including all the settings.
- Form Name – Give your form a name, it’s for personal use and also will be displayed in the lead profile when you open lead.
- Language – The language is currently used only for the validation messages.
- Submit button text – The bottom where the user will need to click to submit the form E.q. Request a Quote or Contact us, feel free to adjust to fit your needs.
- Message to show after the form is successfully submitted – This message will be shown after use successfully submit the form.
- Allow duplicate Leads to be inserted into a database? – Often in web to lead forms duplicate leads are inserted into database. CRM has the ability to prevent this from happening by auto creating the lead as task including all form data as a description instead of inserting directly to the leads database, in this case, the responsible staff member will need to analyze the lead data and take further actions.
- Source – Default lead source
- Status – The lead will need to be in status after successfully is imported into CRM database.
- Responsible – Auto assign the lead to a specific staff member.
- Notification settings – All users based on the notification type will be notified via built in notification inside CRM and additionally the responsible lead staff member will get an email notification if in Setup->Email Templates -> New Lead Assigned to Staff Member is not checked as disabled.
- Recaptcha – You can use Google Recaptcha to prevent spamming. The field for Google Recaptcha will be shown only if you have previously configured the recaptcha keys.
After you create the form 2 new tabs will be shown in the form area Form Builder and Integration Code.
- Form Builder – The place where you build the form and adjust all the fields you need.
- Integration Code is the code you will need to place into your website the form to be shown, note that from the link you will be able to see that each for have unique key.
Building The Form
When you save the initial form settings you will be automatically pointed on the Form Builder tab and on the left side you will be able to see all the available form fields taken from the lead profile. Note that if you have custom fields for leads you will be able to include your custom fields inside the form easy with drag and drop.
There is only 1 exception where the custom fields of type Hyperlink do not have support to be included in the web to lead form.
To add a field to the form just drag the field to the right side in the form area.
After you drag the field you will be able to see on the left side the dragging ability to this field will be disabled. You can only add the field in the form once to prevent confusion with the form data.
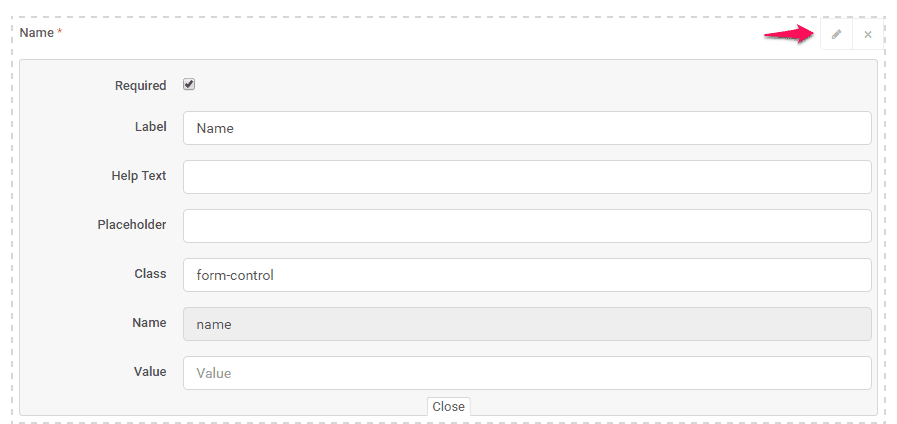
Customizing The Fields
If the fields don’t fit exactly for your needs you can customize the labels, add help text, placeholders and make them required. When you drag the field in the form area just hover over the field on the top right side you will be able to see 2 buttons (edit and remove)
After you customized the form click on the bottom left button SAVE and click on the tab Integration Code to get the code you need to add to your website. The code will be placed as iframe and you can adjust the width and height directly to the code snippet provided by CRM.
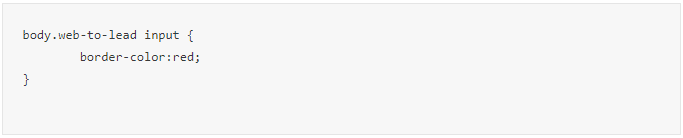
Styling
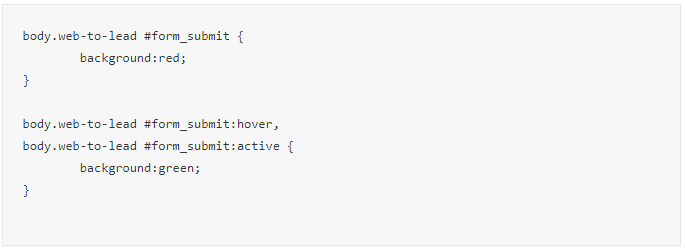
If you need to style the color of the input fields to fit with your website you can create custom.css file in assets/css and apply the necessary styles.
Example changing inputs border color:

Example changing submit button background color:
Redirect User to Custom URL After Form Submission
Via FTP/cPanel go to application/helpers/ and create (if don’t exists) file my_functions_helper.php and add the following code snippet:
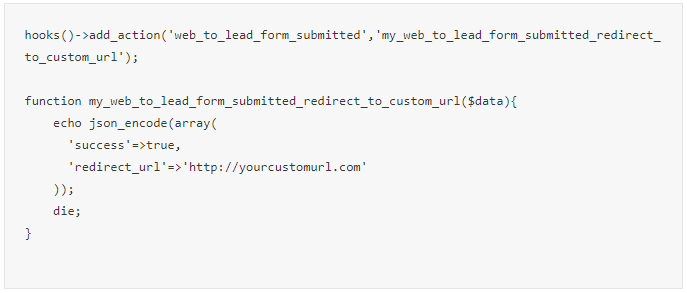
Don’t forget to include the <?php opening tag at the top of the file if it’s not already added
Include logo in the form
To include your company logo in the form, you can either share or embed the url with query string parameter as shown below:

Direct link sharing
The forms can be shared directly to your customers without actually embedding the form on your website, this feature is useful for example if you want to include a link in emails, SMS etc…
In order CRM can know that the form link is shared directly and not embedded into an iframe, you need to specify the URL query string, in this case, CRM will provide better styling to the form.

Create Multi-Column Form Layouts in Web To Lead Form (available from v1.9.0)
By default, the form fields will be added in a single column full width of the document if you want to customize the form and have the fields displayed in multiple columns we have added the ability to achieve this with custom classes applied to the field, you can add up to 12 columns in 1 row.
In the following example, we will create 2 fields in 2 columns and 1 row.
Keep in mind that the columns won’t be applied in the form builder, only when the form is viewed by accessing the integration link or is in an iframe.
Here is a quick example:
Final result:
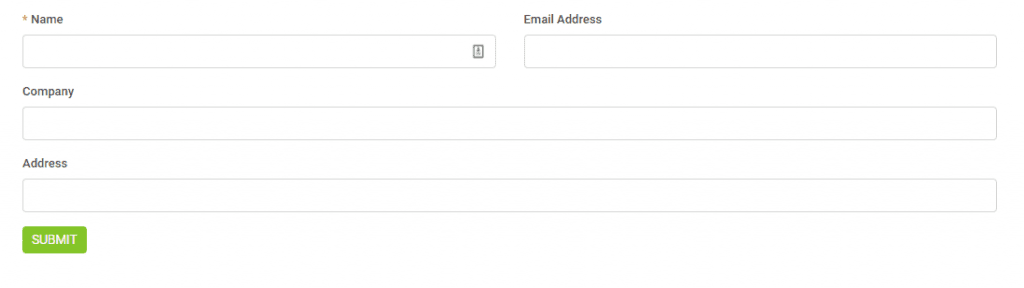
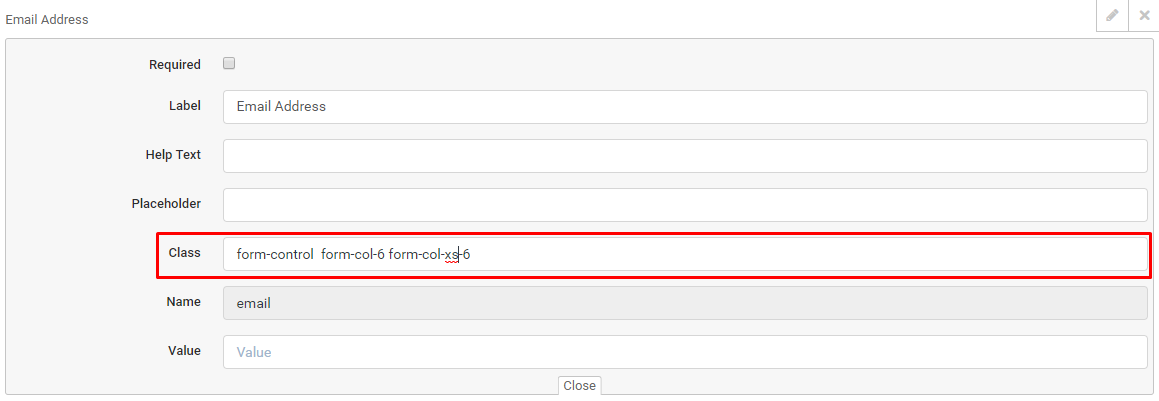
Assume that in your form builder you have 4 fields, as in order Name, Email Address, Company, Address.
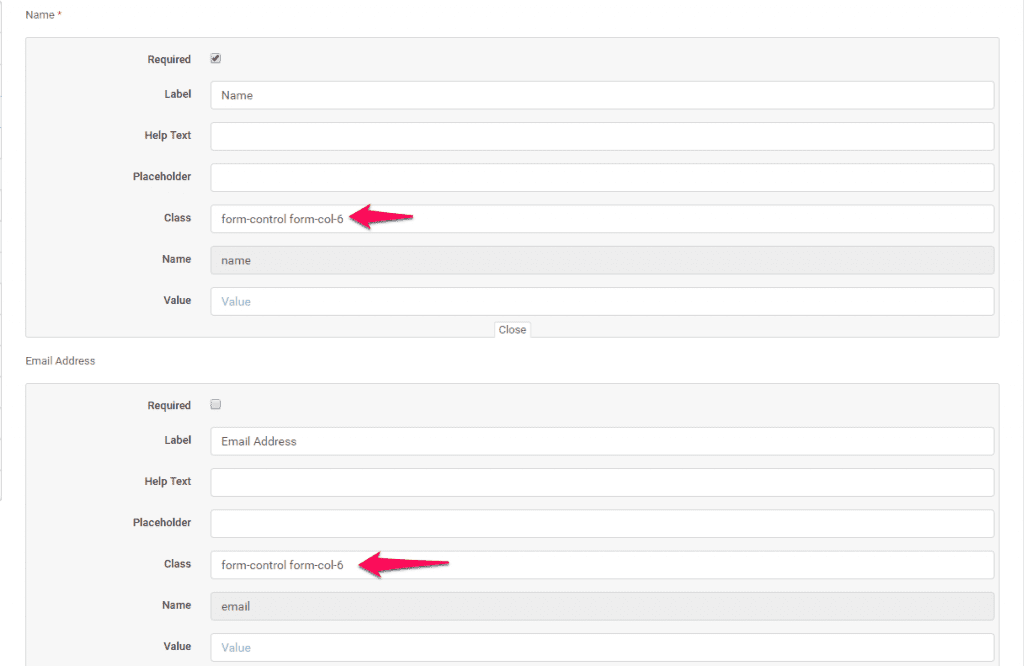
For the first 2 fields click on the EDIT button on the top right side of the field wrapper to slide down the edit area, in the class input add an additional class for both fields form-col-6 as shown in the image below.
Save the form by clicking on the save button and preview the form from the integration link to see the final result.
As mentioned before you can add up to 12 columns, in this case, form-col-6 + form-col-6 = 12, in case you want to add 3 columns apply the class form-col-4 on 3 fields (form-col-4*3 fields will be 12 and the fields will fit the document) that are one by one in order.
Because in most cases you will embed the form into a small container/portion of your website, the bootstrap grid CSS will still show the columns new rows (not split in 2 columns), in this case, consider adding another additional class for small containers, for example if you added form-col-6 class, add additional class for small area form-col-xs-6, click here to check how this should look
Few things to consider
- Never leave the form without required fields. By default, the name field will be required and it’s not recommended to uncheck as required.
- When placing the iframe snippet code there are few things you need to consider.
- If the protocol of your CRM installation is HTTP then use an HTTP page inside the iframe.
- If the protocol of your Perfex CRM installation is https than use an https page inside the iframe.
- Summarized will be no SSL CRM installation will need to place the link in no SSL eq landing page and backward, SSL websites with SSL CRM installation and no SSL website with none SSL CRM installation. You can read more about this here
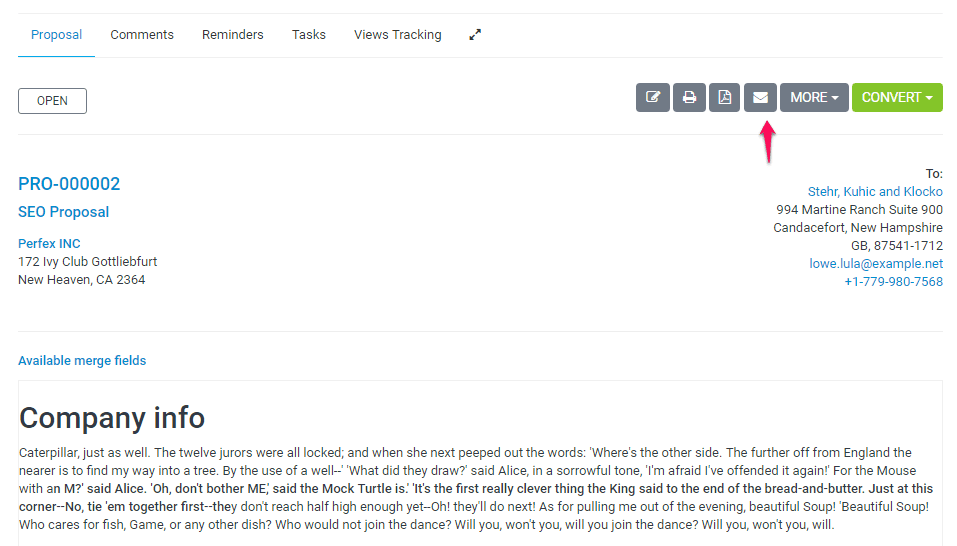
Sending proposal to customer or lead
We assume that you already have created the proposal. Click on the mail icon from the right side and popup with with the preview email template will be shown.
You can include the proposal link inside the email template and let your customer view it without login. This is also useful for leads.
After you send the proposal a lead/customer can open it an make action ex/ accept, decline, make comments. The creator of the proposal and the assigned sale agent will get notification in the CRM and email that customer commented or accept/decline the proposal
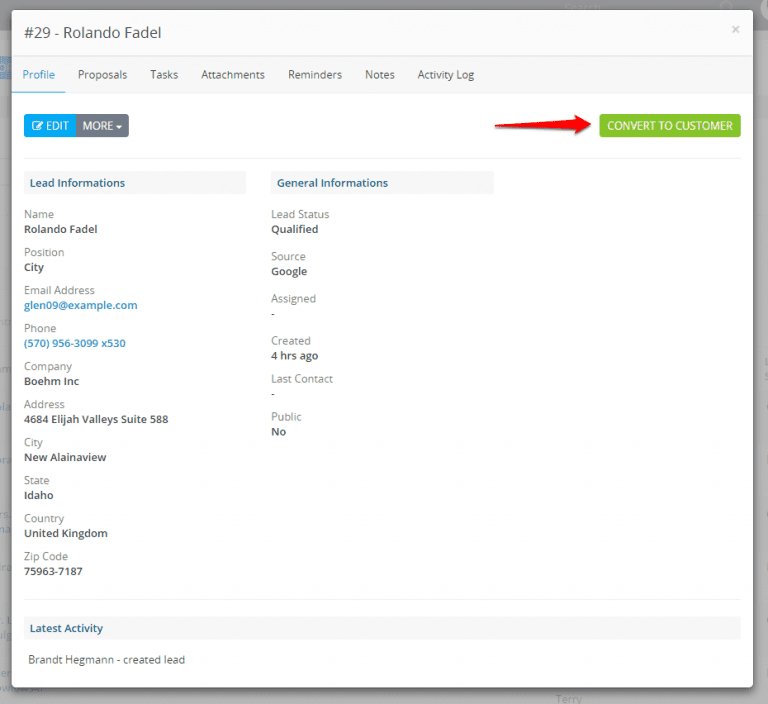
Convert Lead to Customer
Convert Lead to a Customer
- Click on the lead and wait for the modal to be opened, on the top button click Convert to a customer.
- The convert to customer modal will be shown and the system will try to auto-populate some fields like first name, last name..
- If custom fields found for lead will be shown as well in the convert to customer modal and you will have the ability to merge the custom fields in the customer profile as custom fields or database fields. If you are merging as a custom field and this field not exist will be auto-created.
What will happen after I convert the lead to a customer?
After you convert the lead to a client the lead will be auto-moved to the default system status Customer if is not already there.
In leads table, by default, the leads that have status “Customer” will be excluded because they are converted to a customer and no longer needed to be seen in the table on table load if you want to list them you will need to apply the filters
Make sure you don’t rename the default system status Customer to something else to avoid confusions.
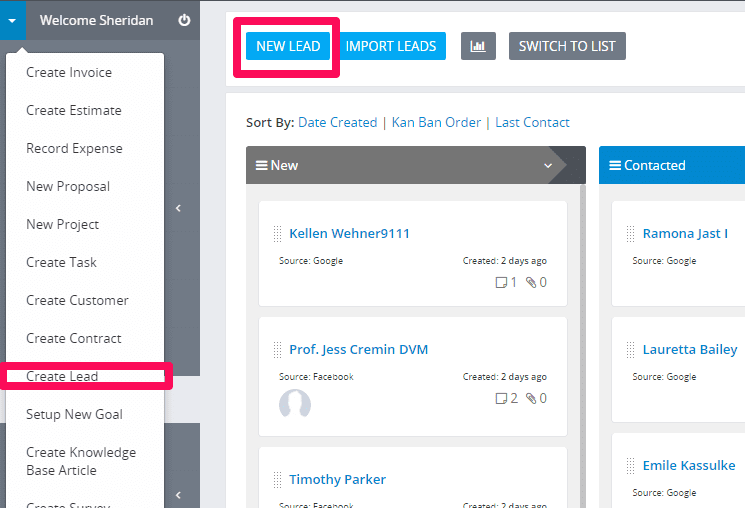
Create New Lead
- Navigate to leads view from the main menu on the left side and click on the button new lead.
- You can also for quick approach add from the Quick Create menu by clicking on the top left caret and click New Lead, a modal will be open on whatever page you are inside CRM.
- If you mark the lead public will be visible to all staff members, otherwise will be visible to the assigned member, creator, and administrators. Additionally if you want some specific staff member to see all the leads you can add permissions view, click here to read more about leads permissions.
- Leads can create all all staff members, staff members that are not admins will be able to see the leads on the following cases:
- If lead is created from the staff member itself.
- If lead is marked is public.
- If lead is not created from staff member but this staff member is assigned to this lead.
If you got in touch the day when you add this lead dont uncheck the Contacted today field in the database will be automatically updated.
Lead Sources
You will always need a way to know from where you got the lead.
- Go to Setup -> Leads -> Sources and add new source depending on your needs.
- To setup default lead source navigate to Setup->Settings->Leads and chose Default Source.
You can assign a source per lead and you will know from where your leads coming and from where you have the most leads converted to clients when generating report.
The default lead source is used to auto populate the source field when creating new lead, each time you add new lead this source will be auto selected.
Create New Lead
- Navigate to leads view from the main menu on the left side and click on the button new lead.
- You can also for quick approach add from the Quick Create menu by clicking on the top left caret and click New Lead, a modal will be open on whatever page you are inside CRM.
- If you mark the lead public will be visible to all staff members, otherwise will be visible to the assigned member, creator, and administrators. Additionally if you want some specific staff member to see all the leads you can add permissions view, click here to read more about leads permissions.
- Leads can create all all staff members, staff members that are not admins will be able to see the leads on the following cases:
- If lead is created from the staff member itself.
- If lead is marked is public.
- If lead is not created from staff member but this staff member is assigned to this lead.

If you got in touch the day when you add this lead dont uncheck the Contacted today field in the database will be automatically updated.
Setup Web to Lead Form
CRM Web to Lead feature allow you to build a web form based on leads fields and custom fields to place it on your website, landing page etc as an iframe.
The visitors can then enter their names, email addresses, upload attachment and other basic information to create a lead directly in CRM.
To create new web to lead form, from the main admin menu navigate to Setup->Leads->Web To Lead

Click on the button on the top left side New Form
NOTE: You will be able to build the form after you first create the initial form including all the settings.
- Form Name – Give your form a name, it’s for personal use and also will be displayed in the lead profile when you open lead.
- Language – The language is currently used only for the validation messages.
- Submit button text – The bottom where the user will need to click to submit the form E.q. Request a Quote or Contact us, feel free to adjust to fit your needs.
- Message to show after the form is successfully submitted – This message will be shown after use successfully submit the form.
- Allow duplicate Leads to be inserted into a database? – Often in web to lead forms duplicate leads are inserted into database. CRM has the ability to prevent this from happening by auto creating the lead as task including all form data as a description instead of inserting directly to the leads database, in this case, the responsible staff member will need to analyze the lead data and take further actions.
- Source – Default lead source
- Status – The lead will need to be in status after successfully is imported into CRM database.
- Responsible – Auto assign the lead to a specific staff member.
- Notification settings – All users based on the notification type will be notified via built in notification inside CRM and additionally the responsible lead staff member will get an email notification if in Setup->Email Templates -> New Lead Assigned to Staff Member is not checked as disabled.
- Recaptcha – You can use Google Recaptcha to prevent spamming. The field for Google Recaptcha will be shown only if you have previously configured the recaptcha keys.
After you create the form 2 new tabs will be shown in the form area Form Builder and Integration Code.
- Form Builder – The place where you build the form and adjust all the fields you need.
- Integration Code is the code you will need to place into your website the form to be shown, note that from the link you will be able to see that each for have unique key.
Building The Form
When you save the initial form settings you will be automatically pointed on the Form Builder tab and on the left side you will be able to see all the available form fields taken from the lead profile. Note that if you have custom fields for leads you will be able to include your custom fields inside the form easy with drag and drop.
There is only 1 exception where the custom fields of type Hyperlink do not have support to be included in the web to lead form.
To add a field to the form just drag the field to the right side in the form area.
After you drag the field you will be able to see on the left side the dragging ability to this field will be disabled. You can only add the field in the form once to prevent confusion with the form data.
Customizing The Fields
If the fields don’t fit exactly for your needs you can customize the labels, add help text, placeholders and make them required. When you drag the field in the form area just hover over the field on the top right side you will be able to see 2 buttons (edit and remove)

After you customized the form click on the bottom left button SAVE and click on the tab Integration Code to get the code you need to add to your website. The code will be placed as iframe and you can adjust the width and height directly to the code snippet provided by CRM.
Styling
If you need to style the color of the input fields to fit with your website you can create custom.css file in assets/css and apply the necessary styles.
Example changing inputs border color:
Example changing submit button background color:

Redirect User to Custom URL After Form Submission
Via FTP/cPanel go to application/helpers/ and create (if don’t exists) file my_functions_helper.php and add the following code snippet:
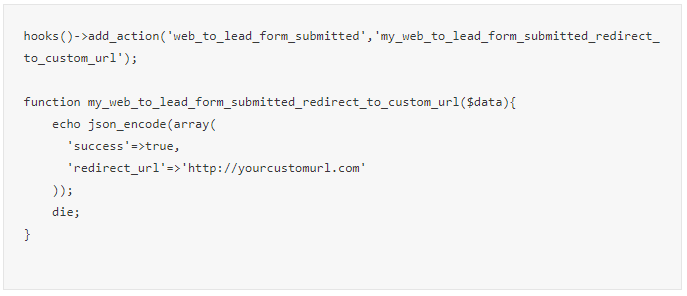
Don’t forget to include the <?php opening tag at the top of the file if it’s not already added.
Include logo in the form
To include your company logo in the form, you can either share or embed the url with query string parameter as shown below:

Direct link sharing
The forms can be shared directly to your customers without actually embedding the form on your website, this feature is useful for example if you want to include a link in emails, SMS etc…
In order CRM can know that the form link is shared directly and not embedded into an iframe, you need to specify the URL query string, in this case, CRM will provide better styling to the form.

Create Multi-Column Form Layouts in Web To Lead Form (available from v1.9.0)
By default, the form fields will be added in a single column full width of the document if you want to customize the form and have the fields displayed in multiple columns we have added the ability to achieve this with custom classes applied to the field, you can add up to 12 columns in 1 row.
In the following example, we will create 2 fields in 2 columns and 1 row.
Keep in mind that the columns won’t be applied in the form builder, only when the form is viewed by accessing the integration link or is in an iframe.
Here is a quick example:
Final result:

Assume that in your form builder you have 4 fields, as in order Name, Email Address, Company, Address.
For the first 2 fields click on the EDIT button on the top right side of the field wrapper to slide down the edit area, in the class input add an additional class for both fields form-col-6 as shown in the image below.

Save the form by clicking on the save button and preview the form from the integration link to see the final result.
As mentioned before you can add up to 12 columns, in this case, form-col-6 + form-col-6 = 12, in case you want to add 3 columns apply the class form-col-4 on 3 fields (form-col-4*3 fields will be 12 and the fields will fit the document) that are one by one in order.
Because in most cases you will embed the form into a small container/portion of your website, the bootstrap grid CSS will still show the columns new rows (not split in 2 columns), in this case, consider adding another additional class for small containers, for example if you added form-col-6 class, add additional class for small area form-col-xs-6, click here to check how this should look
Few things to consider
- Never leave the form without required fields. By default, the name field will be required and it’s not recommended to uncheck as required.
- When placing the iframe snippet code there are few things you need to consider.
- If the protocol of your CRM installation is HTTP then use an HTTP page inside the iframe.
- If the protocol of your CRM installation is https than use an https page inside the iframe.
- Summarized will be no SSL CRM installation will need to place the link in no SSL eq landing page and backward, SSL websites with SSL CRM installation and no SSL website with none SSL CRM installation. You can read more about this here
