


Sending proposal to customer or lead
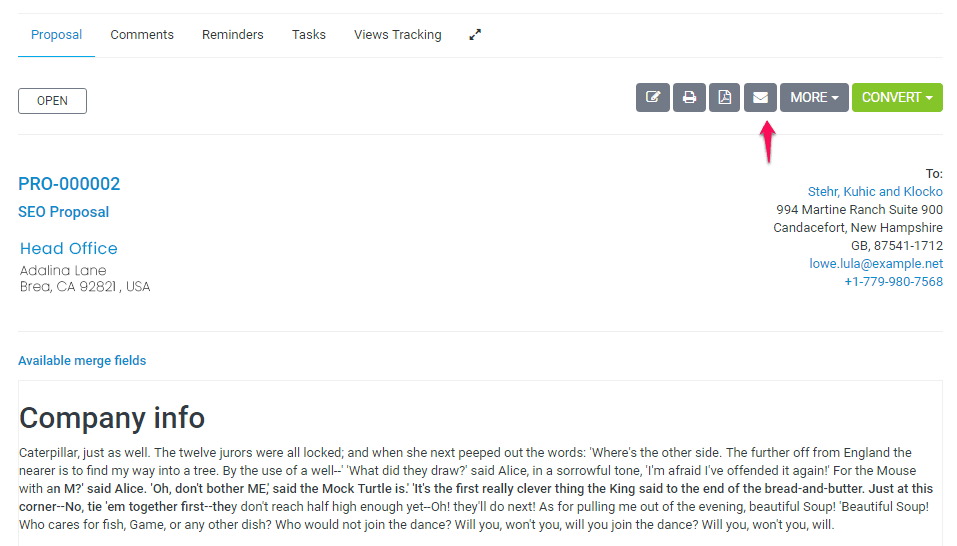
We assume that you already have created the proposal. Click on the mail icon from the right side and popup with with the preview email template will be shown.
You can include the proposal link inside the email template and let your customer view it without login. This is also useful for leads.
After you send the proposal a lead/customer can open it an make action ex/ accept, decline, make comments. The creator of the proposal and the assigned sale agent will get notification in the CRM and email that customer commented or accept/decline the proposal
New Customer Contact
New Contact
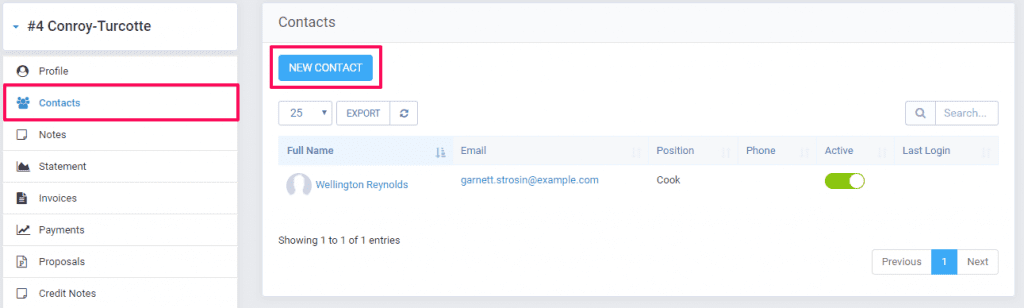
To create new customer contact, open the customer profile in the admin area that you want to create the contact then click on the tab Contacts.
To create new contact related to this customer click on the New Contact button.
- Firstname – Contact first name
- Lastname – Contact last name
- Position – Contact position in a company
- Email – User for login and receiving emails within CRM
- Phone – Contact phone
- Password
- Primary contact – Check to be the primary contact. If this is the first contact this field will be auto checked and no ability to disable.
- Do not send welcome email – Check if you don’t want to send welcome email to this contact. This option can be disabled on Setup->Email Templates -> New Customer Added/Registered (Welcome Email).
If you disable this email template a welcome email won’t be sent event if this field is not checked.
- Send set new password email – An email will be sent with a link the contact to set a new password.
The link will be valid 48 hours.
- Permissions – Default contact permission can be assigned from Setup->Settings->Customers. If the contact doesn’t have any permissions and menu items from the customers area will be hidden too.<br>
Adjust the contact permissions to fit your needs, the permissions define what modules customers will have access
Contact Permissions
In CRM you can configure permissions for each customer contact to fit for your requirements, the customers area offer various features but if you are not using a specific feature you can revoke the contact permission for this feature and the feature won’t be visible in customers area.
Eq. If the contact doesn’t have permission invoices won’t be able to see invoices when this contact is logged in inside the clients area.
Feel free to adjust the permissions to fit your requirements.
Currently available permissions for contacts are:
- Invoices
- Estimates
- Contracts
- Proposals
- Support
- Projects
Email Notifications
For each contact in CRM, you can configure separate email notifications, as an example if you don’t want the contact to receive invoice overdue notices, you can toggle the email notification for invoices. Keep in mind that if the customer has only one contact and you turned the email notifications for this contact, then no emails will be sent for any of the related features.
Another example, let’s assume your customer has 5 contacts and all of them have access to projects, but you want only one contact to receive any projects related emails, in this case, you will give permission for projects for all 5 contacts, but only to the one contact you will turn on email notifications eq for project and task, in this case, this contact will only receive emails related to the projects and project tasks but not the remaining 4 contacts.
The email notifications feature for contacts in CRM is also used to pre-select the contacts eq while sending an invoice to a customer. If you navigate to Sales->Invoices->[Invoice] and click on the email icon to send the invoice to customer, the contacts that have enabled email notifications for invoice will be auto-selected in the select dropdown, keep in mind that if you select manually some contact that doesn’t have enabled email notification for invoices, the email will be sent to ALL selected contacts.
Currently available email notifications for contacts are:
- Invoice
- Credit Note
- Estimate
- Tickets
- Project
- Contract
- Task – Only for project related tasks.
New Customer
Login to dashboard click customers and on the left side there is a button New Customer.
- Permissions – What permission this customer will have in the customers portal. Ex if you turn of the support system the customer wont be able to use the support system. While in piping will be able to use it.
- Billing & Shipping – This informations are used for invoices/estimates. If your customer have different shipping address for invoice you will need to populate also the shipping fields which will be also auto included when creating new invoice.
- Advanced Options – As advanced options are listed several field.
- Groups – Sort your customer into group after that you will be able also to generate reports by groups and see which customer groups is the most valuable.
- Currency – If this currency is not the system default currency when you add estimate/invoice and select the customer the currency will be auto changed regarding to what is selected in this field. NOTE: You wont be able to change the custom currency if there is transactions found.
- Language – If you have multiple languages you can easily change the customer language. So when the customer will login and have setup different language then the system default everything will be translated based on your translation for this language.
- By default all customer PDF data generated from the admin area are generated in the system default language. If you want to generate in the customer language you can easily goto Setup->Settings->Localization and set Output client PDF documents from admin area in client language to Yes
Fill all the necessary data and click save.
You can also choose if you want to send the Welcome client email template which is configured in Settings Menu -> Email Templates in clients part.
Now your client can login in the clients area from the url www.yourdomain.com/clients/login
You can add new customers very quickly from the Quick Insert button on the top left dashboard menu.

Customer admins
If you dont want to give permission VIEW for staff member to be able to see all customers you can assign staff member as admin to specific customer/s.
Go to the customer profile from the admin area and click on the Customer Admins tab.
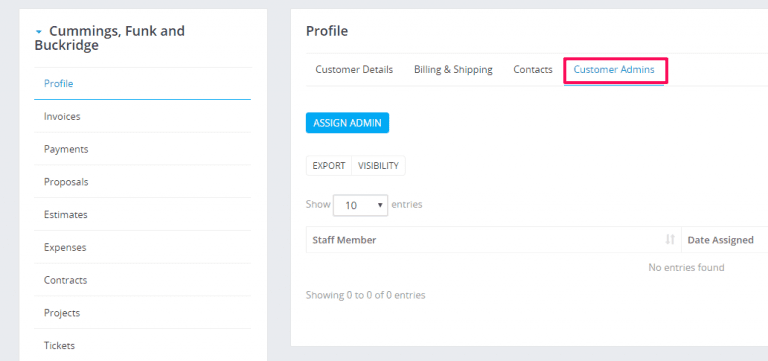
Click on the assign admin button and choose the member/s you want to be assigned as admins to this specific customer
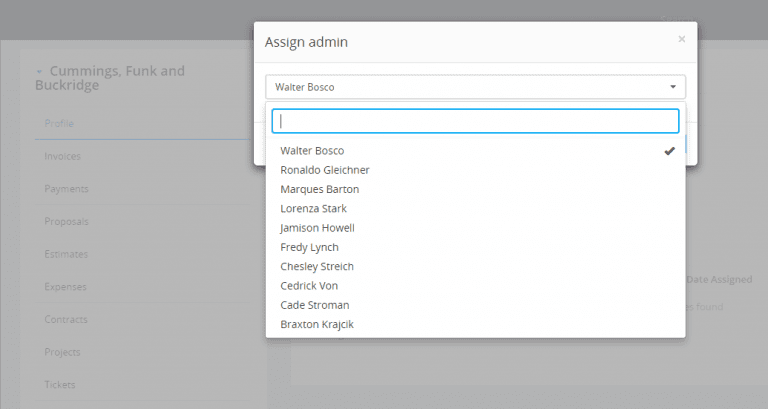
Save the changes.
The member/s you assigned will be able to see now this customer together with the Customer menu item without having the permission for customers VIEW
Customers Registration
You can enable/disable customers registration from Setup -> Settings -> Customers-> Allow clients to register.
Your customers will be able to register at your base URL where CRM is installed eq. yourdomain.com/crm/
If customer registration is disabled you will be able to add only customers from the admin area.
The dropdown for the language is an indicator of the language the contact will use while browsing the customers area.
Keep in mind that the language for the contact is applicable only for the customers area, this means any emails, PDF documents will be still sent from the default language that is selected in the customer/company profile.
Reports
General Customer Report
Customer report can be generated from the Reports feature.
Select Report type Customer and the necessary report time you want to see about clients. Report with all customers will be generated you only need to search the client you need to see report.
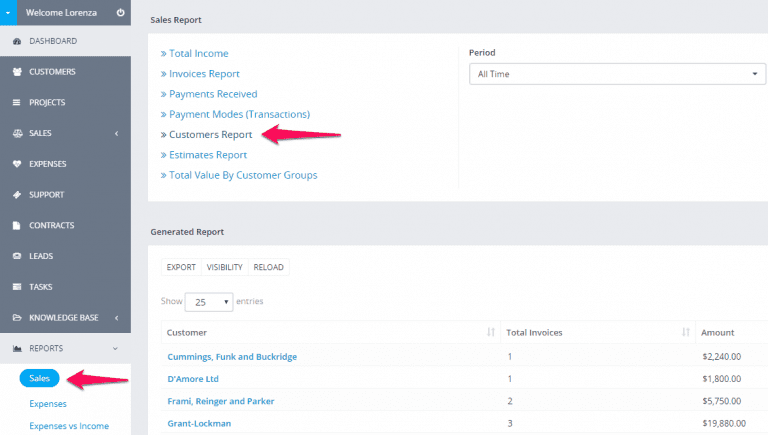
If you have invoices with different currencies you will also need to select currency. By default the given report will be from your base currency which is set in Setup -> Finance -> Currencies
Customer report from profile
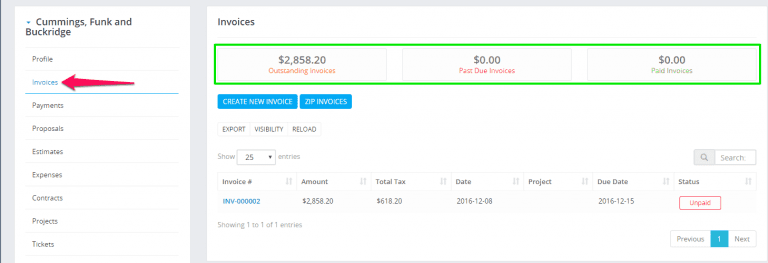
Navigate to the customer profile and click on the Invoices tab
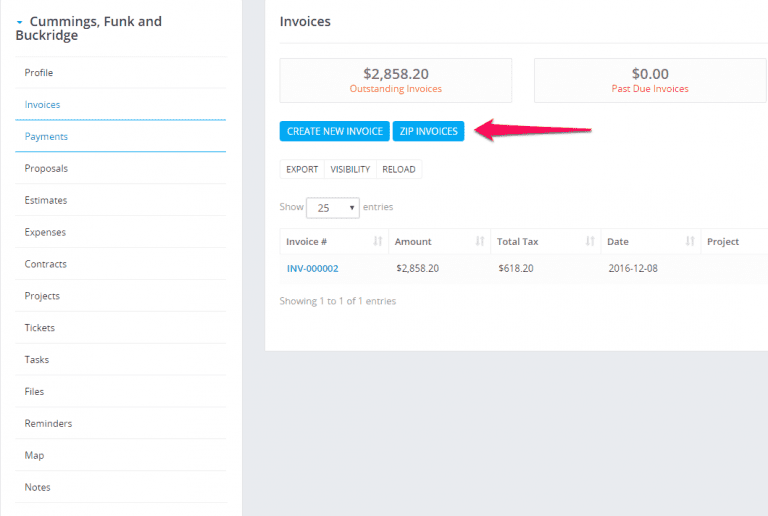
Exporting Customers Invoices/Estimates/Payment to ZIP
Go to the customer profile and click on the tab you want to export data eq. invoices
Select status or just leave it All and click Submit. All invoices based on your selected options will be added to .zip file.
You can choose start and end date, the date is based on invoice/estimate/payment date